If you are like me, you save and reuse those plastic Walmart (or anywhere else) bags. I use them for everything – particularly rough pull-up explosions (because while we are learning to tinkle in the potty, we outright refuse to do the other in the potty), bathroom and bedroom trash can bags, car trash bags, and puppy accident clean up bags (ugh, potty training TWO, I suppose).
I’m happy to reuse the bags because I absolutely hate the idea of them just being used once and tossed – the earth doesn’t have time for such literal garbage. But I do have a few rules:
- I toss out all bags that had items with condensation in them so they don’t mold as they’re being stored.
- I toss out bags with ripped handles or holes.
- I toss bags that carried raw meat, so that they don’t stink or carry excess germs.
I don’t use these bags as fast as I end up collecting them, and a bag full of bags is ugly in the kitchen hanging on a hook or doorknob, so I decided to get crafty!
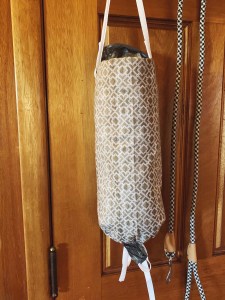
Check out this DIY no-sew plastic bag holder.
All you need is…
- Precut fabric in the color/pattern of your choice
- Liquid stitch
- Bias ribbon-tape (or ribbon in a similar width)
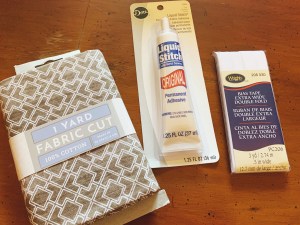
I got all of these items in Walmart’s craft section. You could easily use a fabric fat quarter too, but I preferred getting a yard in case I messed up or to double up on the fabric for thickness.
The first thing I did was cut my fabric yard in half. Then that half got folded evenly to double up the fabric. I laid out my now square of fabric to have the folded end closest to me as the bottom and frayed but matched ends at the top. Because I folded in half, I have the pattern facing the inside (facing up) and outside (facing down on the table top).
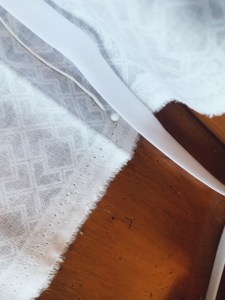
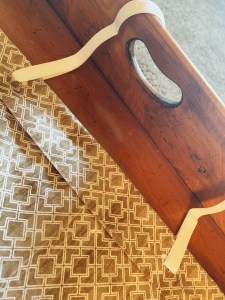
At the folded end at the bottom, I went ahead and tucked in one long piece of the white ribbon tape. It nestled perfectly into the crease. Above where the ribbon tape laid in the crease, I drew a thin line of Liquid Stitch. Then, I folded the fabric back and pressed the Liquid Stitch into place. This created a pocket for that ribbon tape, which can (when dry) become a pull-able and tie-able end.


At the top, frayed end, I wanted to create a smooth edge, so I drew a zigzag of Liquid Stitch and folded over, pressing down to seal.

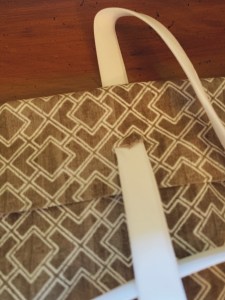
Then, I cut another strand of ribbon tape. I cut two minor slits in the now-glued top edge. This allowed me to thread through the ribbon tape. I glued the edges down to create one handle. This is going to be the top of the bag, where it can hang and where you can place in your plastic bags easily.
The remaining side edges are frayed (or have potential to be) as well, from having been cut. These edges will need to come together to create a round tube for the bags to be held in.
I first folded over the edge that would be the exterior edge so it looks smoother and cleaner. Then, on the other (non-folded) side, I put a thick amount of Liquid Stitch.
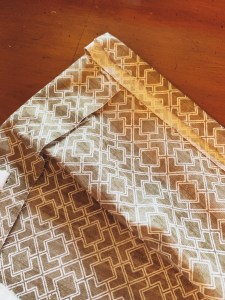

I pressed my neatly folded edge into the Liquid Stitch fabric glue until it seemed to seal. Now I had a tube made of fabric.
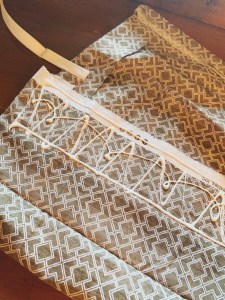
When you pull the bottom ribbon tape into a pretty tight bow, it creates a small opening from which you can pull one bag out at a time. If you need more than one, you can untie your bow and collect many (or all) of your plastic bags.
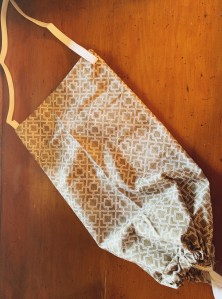
This quick, no-sew project created a useful kitchen storage solution that looks as cute as it was simple!
And the best part – if the Liquid Stitch wears off (which I don’t anticipate since I really do trust this brand), I can add in really small stitches to hold it together. But for now, it’s a complete no-sew project that makes life just a little bit easier!
What do you reuse plastic bags for in your home? Do you have a storage solution?
