
Every young professional – or student or stay-at-home-mom who is managing a household with bills and groceries – should know some important Microsoft Office skills! Whether it’s managing your kids’ after-school activities, paying your household bills or sending work invoices, or organizing your study schedule, Microsoft Office has some amazing features that are incredibly beneficial to know.
Today, I’m going to focus on 3 basic tips that I think are particularly beneficial to all young professionals or students.
#1: Use out-of-office replies – and make them work FOR you.
You’ve gotten the auto responses from other professionals before: Thanks for your email. I’m out of the office but will reply when I return to my desk on Monday.
You should be using these too – but there are ways to make your out of office reply more than a placeholder.
First and foremost, if you haven’t used these before, they’re actually much easier than you think.
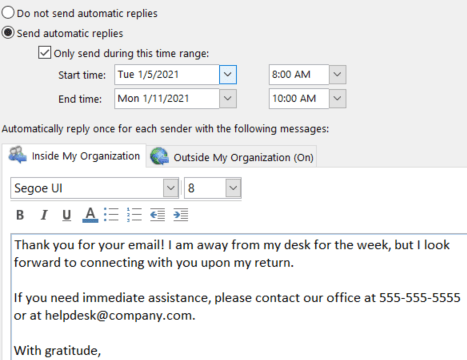
Here’s the step-by-step: In Outlook, simply click “File” in the top left corner. Then select “Automatic Replies,” which should be right under “Account Settings.” Click “send automatic replies” and select your time range. This is my biggest tip in this area: give yourself at least TWO HOURS after you return to work for your auto reply to turn off. That means if you are back in on Monday at 8 AM, select 10 AM. These two hours will let you check your inbox, respond to anything urgent, and prioritize the resto f your catch-up tasks before you start having to reply at your usual in-office response rate.
You can also have a different message for inside and outside of your organization, if that’s helpful to you.
Additional Pro-Tip: Always put your signature in your out of office reply! It looks much more professional, and it reminds them who they emailed, from what company, and likely why they reached out to you. Plus, if it has your office contact info, they’ll know how to get in touch with someone else if it’s urgent.
Another Pro-Tip: You can add a PS and encourage your emailers to check out an upcoming event, your company website, or other important information. This redirect to helpful information can sometimes even answer their inquiry!
#2: Utilize pivot tables for data summaries and specific lists.
If you haven’t yet discovered pivot tables in Excel, your life is about to be CHANGED.
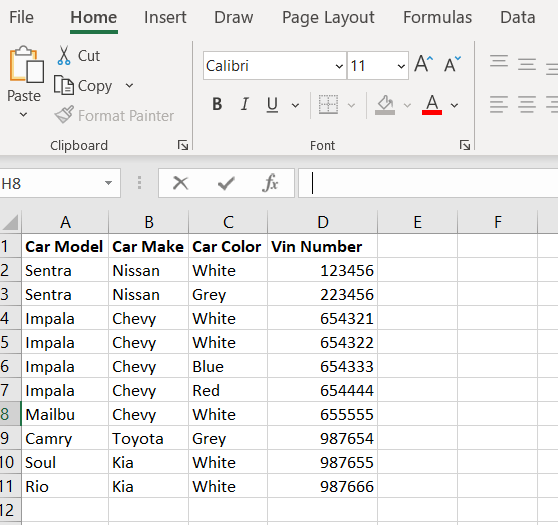
Pretend you are a car dealer. You sold ten cars this week, and you’re about to purchase some more cars from a factory, but you have to determine make and color preferences of your clients. What you want to do is see what your customers like best overall using the data from this week’s sales.
(If you’re not digging the car sales metaphor, don’t worry. Replace with wedding guests with a chicken or beef preference or bills under categories like entertainment, house, and auto.)
In your excel, make sure each line is a “record” – in this case, a sale (in the financial example, a bill or the wedding example, a guest). Then, select all of the data. With the data selected, click “insert” at the top of the window. Then, select “pivot table,” and then “okay.”
This is going to allow you to create a custom pivot table. If I want to see how many cars total were sold, I’ll use the unique identifier (vin number for cars; bill name for bills; guest name for wedding) in the “values category.” Then, to see how many of each make of the car (or category in bills or which side – groom or bride – in the wedding example), put the “make” in the rows section. To see which color choice is best (or beef/chicken, for example), select that and move it to columns.
Now I can quickly see that the grand total of cars sold is 10, that 5 were Chevys, and that white is the most common color sold. (In the wedding example, I might see that of my 50 guests, 38 were choosing chicken and 25 of those were on the bride’s side.)
Even better tip: Double click on any number in the pivot table to get a list of all of those individual items. So I can double click on the number “5” for Chevys to see which 5 cars were sold in that make.
This will CHANGE your life when you’re organizing a lot of data!

#3: Mail merge your large emails for personalized effects.
If you have projects where you are emailing a lot of people with the same message, you should be using mail merges! They will do your work so much faster if you have Outlook!
What you need is a complete list of the people you are contacting in excel. Each row should be a person, and each column is a data point. You absolutely need name (one column for first name and one for last) and email address – but you can add other points too.
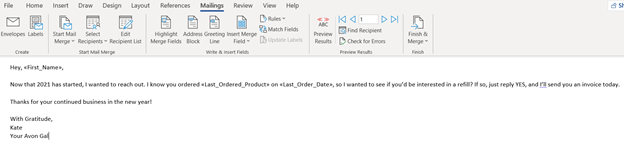
For this example, let’s pretend I am using mail merges for my Avon business. My excel spreadsheet might have columns for first name, last name, email, last date of order, and last ordered product.
Make sure your excel list is saved on your computer. Close the window.
Then, open a word document. Write your email, but remember that the same email is going to various people. Leave spaces for their information to be merged in so it appears unique and personalized to each of them.
Once your message is written, go to “Mailings” on the top of the window. Click “Start Mail Merge” and then “Email Messages.” Then, go to “Select Recipients” and “Use an Existing List.” Then, find your saved list, and select it. Then, hit “okay.”
Go to each place where you want to put in a unique field for that person (name, for example). Select that space or placeholder word, and then hit “insert merge field.” You will see the column headers from your initial saved Excel list. Select the appropriate one (see my second picture below).
Once all of your merged fields are input, you can hit “preview results” to see what one of your emails might look like.
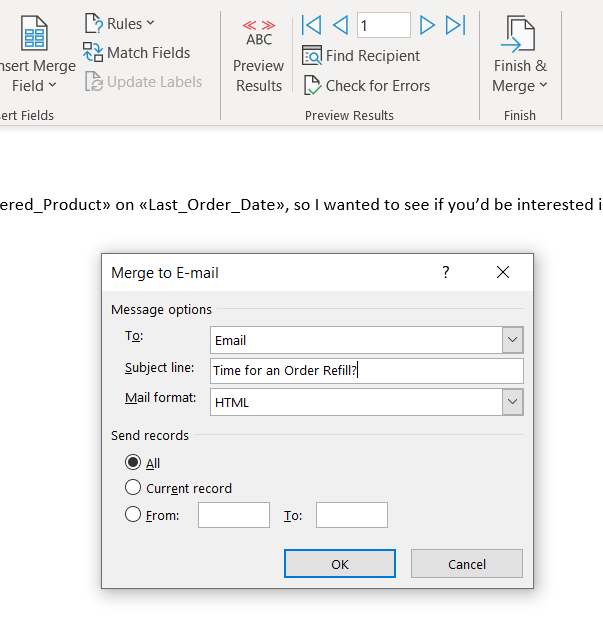
When it’s all ready and you’re pleased with the email, go to “Finish & Merge” and then make sure that your column header for email appears in the “to” section. Also, you can write your unique subject line in that field.
When you press “okay,” it will send emails (with merged fields) to each address on your list!
If the recipient replies, it’ll come to your Outlook account.


What other Office tips and tricks do you use most? Comment below! Also, if you try any of these tips and need help, don’t hesitate to email me at katewithatwang@gmail.com – always happy to help!
