For over a year now, I’ve kept my kitchen and steak knives in a drawer. They were in a silverware separator, at the back of the drawer, and it was the highest possible drawer so that my son couldn’t get to them.
I lost my nice knife block, which was a gift from my parents, in the divorce process. The knives I have now are a cheap set I had pre-wedding that didn’t come with a block; when I got the nicer set from my parents, I set aside the cheaper set. My sister, a few years later, moved out on her own, and I gave her the cheap set to use at her first place. Then, as I was getting divorced, she was getting married, and she was gifted a nice knife set, so I got the cheap ones back. They’ve served us fairly well, for a store brand set.
But now that my toddler is getting taller (seriously – I’m hardly 5’4” so where is this coming from?!), I needed to move the knives up even higher to be extra safety-conscious.
I decided to keep an eye out for an empty and used wooden knife block. While thrifting with my mom and sister one weekend recently (with masks and sanitizer and on a weekend when my son was staying with his father), I found one! It was $4.99, and it was at a KARM (Knox Area Rescue Mission) thrift store.
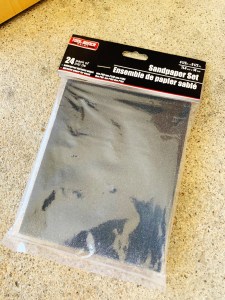
I also purchased sandpaper – I bought a pack of small sheets at Dollar Tree, actually, and a can of spray paint at Rural King in Heirloom White. I really do like the Rust-oleum brand of spray paint for any project – it’s just really durable for indoor or outdoor use.
After a Lysol spray, I sanded lightly – just to knock the shine off of the wood block. Then I spray painted all sides.
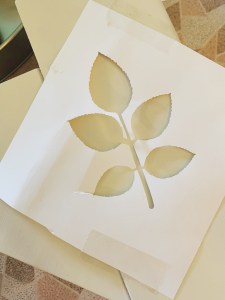
Once that dried, I knew I wanted to stencil something on the block to give it a little extra character. My sister has a Cricut and she printed this cute sprig stencil for me on cardstock. Once the spray paint had dried, I used a sponge brush and some deep tan paint to paint on the stencil design.
I didn’t get it perfectly even, but that’s okay – I like the DIY look and think it looks fairly even with the bottom portion taken into account as surface space too, which was where my initial thought process took me.
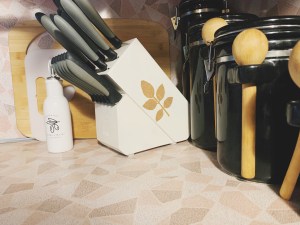
I love how this turned out! I think it looks good, coordinates my kitchen well, and – most importantly – keeps my knives up in the hard-to-reach counter corner, away from little fingers.
Safe, cute, and all for under $10! What DIYs have you done for your kitchen?
I’ve added a new member to my family: my basset hound puppy named Flash!
Unless you know me personally, you probably don’t know about my recent history with dogs. I love them – absolutely love dogs – but I’ve not had an easy way to go. Let’s go on an abbreviated trip down memory lane.
Buddy
When I was still married, we had a wonderful rescued golden retriever, who was, honestly, making it hard for me to consider divorce even in the toughest parts of my marriage. In a best-case divorce scenario, you can co-parent a child; you can make sure you have time to pour into that child, to teach and lead them, and to love them unconditionally. When you divorce with a pet, the dog goes with their original owner, and, unfortunately, my ex-husband was the one to adopt Buddy officially. You can’t co-parent or make a custody agreement for a golden retriever, y’all.
Buddy was the best, and I knew as I seriously considered divorce, that I was not just giving up a marriage I had been determined to make happen, a house I owned and wanted to raise my children in, the potential for more than one child, or a traditional two-parent home for my son, I was also going to be giving up my sweet dog.
The day before I ended up leaving my husband, Buddy had to go to the vet, and they found a large mass in his throat and neck, which ended up being from lymphoma. They needed to put Buddy down because he had lymphoma and it was really pretty rough. We decided, tearfully, to take their recommendation.
My then-husband was with Buddy at the vet. I was, unknown to everyone but my mother, at my childhood home in my childhood bedroom. I had taken a personal day off of work to pray about the state of my marriage and of myself as a wife and mother. I was at my wit’s end with my circumstance, and I was hurting really badly. I was praying over and over and over again in my empty childhood home, and that’s when I got the call that they needed to put Buddy to rest. I was a complete mess – but I also had a very clear realization that everything was going to come together to allow me to make the decision that was ultimately best for me and my son.
Eleanor
Around Christmastime of 2019, about 5 months after the divorce was final and my son and I were living in our rental, I started to get really lonely on the nights he spent with his father.
I had missed Buddy so much, and had still been accustomed to a dog when I was living with my parents during the 11-month process of my divorce, so I knew that some canine companionship could be helpful.
I started looking at dogs in the East Tennessee shelters. I found a few I was interested in at a really nice shelter in Knoxville. I met Eleanor, about an 8-10 month old dog that likely had some cattle dog in her. She was really shy and reserved, and the shelter said she had been bitten by another dog, so she likely wouldn’t be comfortable with other dogs, but had been good with children and adults in their experience. She was a sweet girl and took to me right away in the visit room. She came home that evening with me.
At first, she and my little one got along really well. She obviously loved him and he was over the moon for “Ellie dog.”
However, after the first two-ish weeks, she started to seem really anxious with his running about. She actually growled at him a few times for running near her, and I could tell his energy level was causing her severe stress and discomfort. I made a REALLY hard decision for her and for my son – that I would have to surrender her back to the shelter for a family with older children or no children. I was terrified that her anxiety and discomfort would lead to an altercation and could hurt my son. I didn’t want her to live in an environment that triggered her, for my son to be potentially hurt, or for me to be stressed about “what if” constantly.
It was so difficult to come to that decision. Jake, my boyfriend, was with me when I decided, and he dealt with a lot of my tears and feelings of guilt. I wasn’t able to take her back myself – I had my son and was afraid to have them in a small enclosed space together on the drive there. Jake made accommodations to take her back for me – which was challenging since they usually only allow the adopter to surrender back – but eventually they agreed with my license, a letter with my signature, and a lot of conversation and explanation.
The good news is that I saw a picture of Eleanor in the shelters post featuring one of their foster families. It looks like she was being trained to be more comfortable around other animals and people, so I am extremely glad to see that the effort was taken to make her available to the right future family.
I was – and still am – heartbroken at the loss of her for my family. She was just a a nervous, scared dog, and wasn’t violent, but I am relieved to know how well that shelter took my feedback into account and said they would use it to train her and to get her into the right home.
When I posted on my private social media about the heartbreak of having to take her back to the shelter, my aunt said something that really comforted me: “Momma knows best!” And the realization that it was obvious that I was putting my son’s needs above my own heartache was so reassuring to me. That simple comment helped me remember that my priorities were in order, even if it was difficult to come to terms with the situation.
When I told my landlord and my parents about the situation, both parties suggested that I get a puppy, which I would train myself and would grow up with my kiddo and be used to his energy level. My landlord offered to hold my pet deposit to see if I found a puppy that was a good fit in the coming months, which I appreciate so much.
Fast forward 6-7 months, and I found my puppy.
Flash
It was a couple Friday nights ago, and my son was spending the weekend with his father. My boyfriend was coming over to go to a family game night with me, my parents, and my sister and brother-in-law, but Jake works a lot later than I do, so I was dressed and ready and waiting for him to arrive. I was just netflixing and social-media scrolling when I saw my local animal shelter had a basset hound puppy!
I had always wanted a basset hound – even when I was a kid. And this dog was just 3 months old. I immediately messaged the shelter on Facebook and asked if he was still available; he was, and I could make an appointment to meet him the next day!
I immediately told my family and Jake that I was considering adopting him – and they were all so supportive! Well, Jake was admittedly concerned that it might lead to another Eleanor situation, but we talked and said that we could just meet Flash and see his temperament and learn more about him before making any decisions.
That Saturday, Jake went with me. Flash was so calm in the shelter, even with tons of other dogs barking and yapping – and he rolled over as I started petting him. We read more about him on his kennel tag, and I was in love. Jake could tell, too – he said “you’re getting this dog, aren’t you?”
I put a deposit on him and they planned to neuter and chip him before I could retrieve him the next weekend.
My parents helped us surprise my toddler – who was over the moon with his new best friend. He adores Flash – I keep hearing “c’mon, Flash! Let’s go, Flash!” And the sweet sound of the little hound scampering along around the house behind him.
So now I’m potty training two – my toddler son and my hound pup!
We think Flash might have a little beagle in him – just from the size of his ears and the features in his face, although he absolutely has the traditional basset hound coat, legs, and eyes.
Here are some precious pictures of this sweet addition to my family!
My hair is mega long. Like when it’s straightened, the longest layers are at or past my waist. It’s long and it’s thick – every hair stylist I’ve ever gone to has been like “shew girl, you got some hair.”
I haven’t always kept my hair long, but I’ve had it this long twice. The first time was as I was leading up to my (first) wedding. I wanted it long for wedding pictures, but I didn’t really have a routine for hair care outside of brushing, washing & conditioning, and styling it. I wasn’t in the habit of really spending time or money on my hair to keep it healthy, so it was the hot mess express. I actually ended up with a pretty serious knot before my wedding, and my parents (yes, both mom and dad) had to help me get it out so I wouldn’t have to hack my hair before the big day.
Once I was married, I did like a lot of girls do after a big life change, and I got it hacked short – like shoulder length.
When I became pregnant with my son a few years later, I was already in the process of growing it out, and it was already what most would call medium-long in length. Having my little one actually dried my hair out a lot, so my entire pregnancy and still to this day after, I don’t have to wash my hair except every 5 to 7 days. (Kinda a great push present, honestly.)
You might think that I sound like the kind of girl who would go get it chopped again when the divorce happened, since I was so eager to change things with a relationship life stage previously, but I was bound and determined to keep my long hair. I love my mermaid hair, so it was staying, even if my husband was not.
I did start investing in way better hair care, though. I decided I wasn’t going to wear it up all the time, and I wasn’t going to skimp on my products, either. (Not to say I spend a ton on hair products, but there was a lot of financial control in my marriage, and I was on such a strict budget each month that I didn’t have extra money to invest in a lot of the things I had wanted to try for my personal care. Looking back, that’s really unhealthy and should have been a red flag, but hindsight is 20-20, and I can devote a whole separate post to that in the future, if you’re interested.)
All of that to say that when I was finally on my own and responsible for my own finances, I started making sure I could afford reasonably priced hair care items. I wanted something that was set aside for me, and that seemed like a reasonable priority to have, and I’ve kept up with it pretty well since then.
I’ve gotten into the habit of deep conditioning my hair every couple weeks. A few weeks ago now, I posted a few pictures from an adventure to an old prison in East Tennessee with my boyfriend (LINK TO FB), and a few friends posted comments about my hair, and one suggested I try a tutorial-style post on my blog. So I took some pictures and a time lapse the last time I deep conditioned my hair and styled it after.
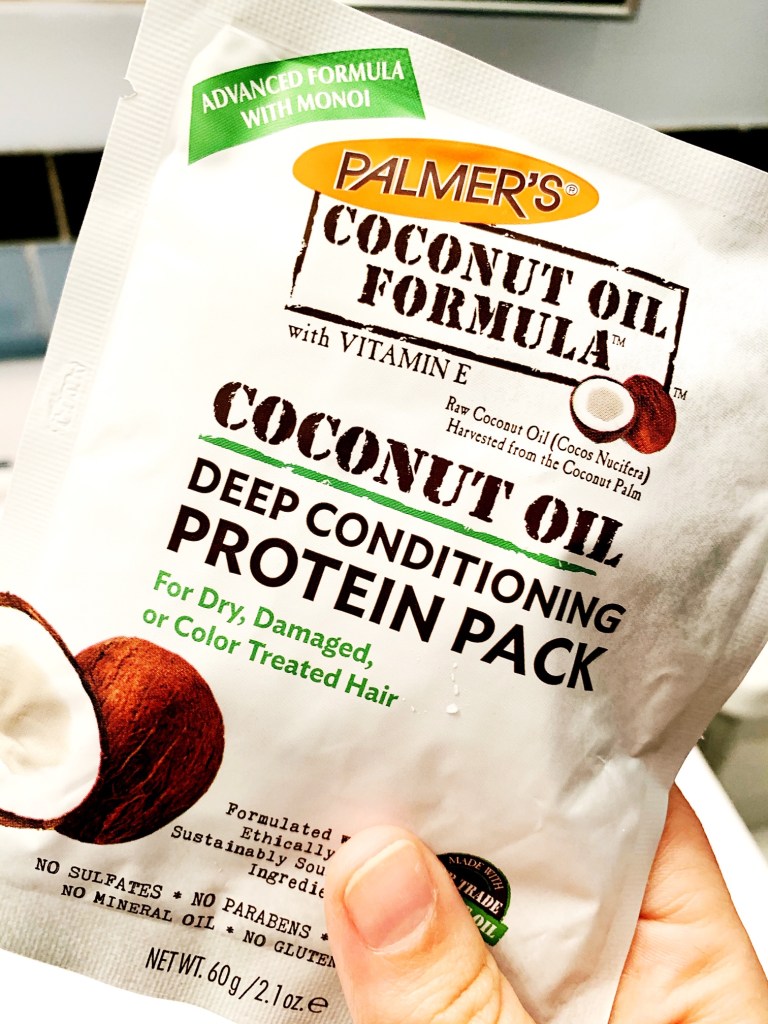
I’ve used a lot of different conditioner packets, and my all-time favorite is Palmer’s Coconut Oil Deep Conditioning Protein Pack. I can usually get 2 uses out of a packet, and with my long and thick hair, I think that’s pretty impressive. First, I suds up my entire scalp with the Aussie Miracle Volume Shampoo and wash like normal. Then, I only apply the Palmer’s Conditioner to the bottom half of my hair, so about earlobes down. I let this sit, then rinse it out after about 10-15 minutes. My hair immediately feels silkier and smells AMAZING.
After my shower, I let my hair towel dry. If I’m doing this in the morning, like I was this day, I let it towel dry while I do my makeup. If it’s in the evening, I’ll let it towel dry while I fold laundry, run the vacuum, work on a graduate school assignment or reading, or watch an episode of a sitcom. It really only needs to towel dry for like 20-30 minutes, since I always blow dry it too.
As you can see in the time lapse above, I blow dry my hair on high for a good little while (again, I have a ton of it). Once it’s fairly dry, I spray in some OGX Renewing Argan Oil of Morocco, just on the ends – similar to where I put the conditioner – to give it a little extra shine. I use the blow dryer on low this time and just make sure I can brush through it really smoothly. (Even if I’m just re-straightening my hair throughout the week when I’m not washing, I’ll often do a few sprays of the Argan Oil again. I think it really makes my hair look shiny and smooth and put together.)
Then, I separate my hair out into sections. I use an inexpensive hair claw-styled clip to pull the sections up that I’m not straightening yet. Something like this works really well. As I straighten it, I also use dry shampoo at the roots to give a little lift – and to keep me from having to wash my hair earlier than about 5 days. For a dry shampoo that works fairly well but is still affordable, I like Not Your Mother’s Beach Babe Texturing Dry Shampoo. You do have to brush through to diffuse some of the powdery spray, but it holds up really well for me.
As you’ll see, my toddler son felt he needed to make an entrance toward the end of my time lapse video. He really likes for me to do his hair when I’m doing mine, so I always share a spray of my detangler of choice, Not Your Mother’s Knotty to Nice detangler and then brush through his hair for him. This detangler is my favorite one that I use throughout the week when I’m not washing or conditioning my hair in the shower, so I definitely recommend it if you have long hair that you wear in a messy bun often.
The final step for me, before doing a final brush through but after I’ve finished straightening my hair, is to protect my ends from too much damage. Let’s be honest – most of us aren’t getting our trimmed as often as we need to (I’m world’s worst at this) even when there isn’t a pandemic raging around us. So while COVID-19 is running the show, with salons requiring masks and it being harder than ever to prioritize your hair’s health, your ends are gonna be SPLIT. So this product is one that a stylist recommended to me, and I absolutely love it and think it makes a huge difference in my hair health. Strong Sexy Hair Seal the Deal is a split-end mending product made with aloe that really makes your ends appear smooth and uniform. I can’t recommend this enough, seriously.
So that’s my straight-hair tutorial for long hair! What do you do with your long hair? Do you have favorite products that I should try? Comment below!
Confession: although I was a SUPER sloppy teen (don’t even get my mother started about my childhood bedroom), I am WAY more focused on cleanliness in this season of life and with a little one around.
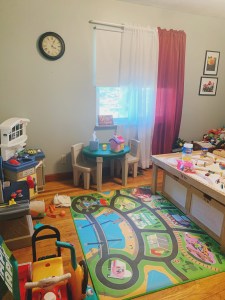
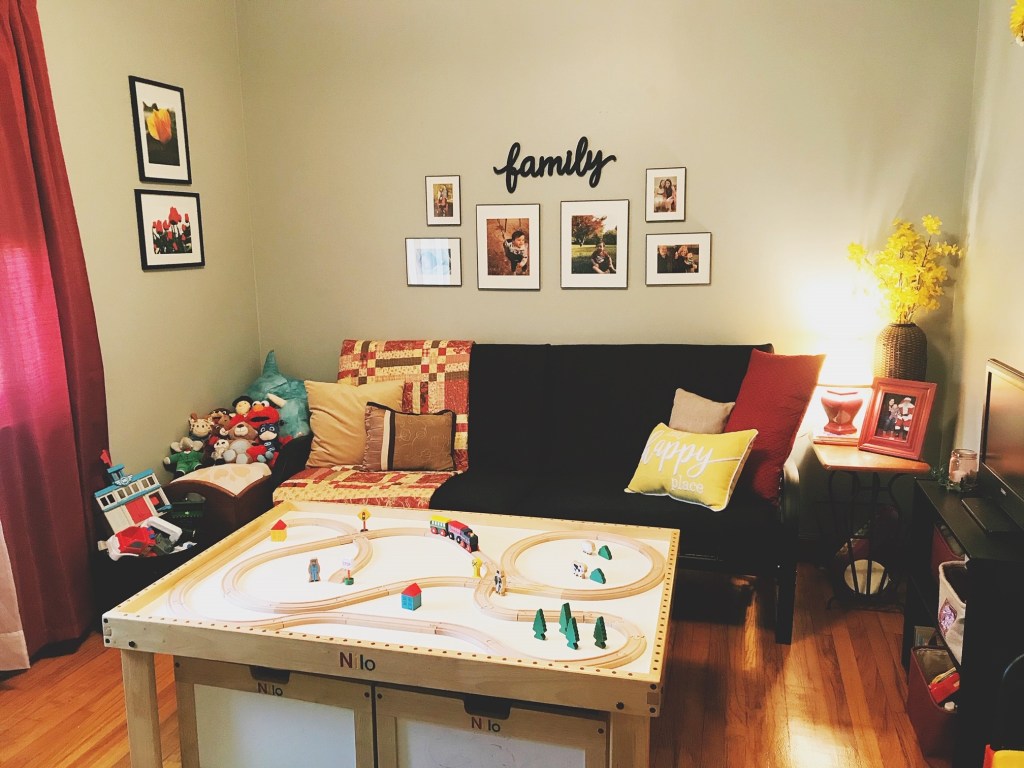
When my divorce was being finalized and I was looking for a new place to live with my little one, I had a friend through work whose family had an empty ranch house not far from my office or my son’s sitter. The family was – and has continued to be – so sweet and gracious, and they lined everything up so I could be totally comfortable in the house – including sharing that the grandmother who had owned the house had designated the third bedroom as a playroom for her grandkids. Because we didn’t need a third bedroom, I decided to hold to tradition and turned that room into my son’s playroom. (I’ve added a full-sized futon and stored sheets in case we ever need the space to double as a guest room, too.) My son absolutely adores his playroom – and what he deems “his couch.”
Usually, I lightly spray the room down every other night or so with Lysol, just to kill any funk that might have landed on the play kitchen, train table, or hot wheels. (I do this daily if he’s under the weather, of course.) On Monday nights, my son is with his father, so I usually do my deeper clean of the playroom then – vacuuming or swiffering, Clorox wiping surfaces, dusting, et cetera.
Well, I have to admit – last week I was off my game. I actually took a sick day for myself on Monday because I was dealing with exhaustion and a migraine, so I lazed on the living room couch all day, and the only things I got done were rest, the entire first season of Sweet Magnolias on Netflix, and one load of laundry.
So when Tuesday rolled around, and I brought my son home, I realized the playroom hadn’t been cleaned super well for the week. If you have a toddler, you know it is near impossible to deep clean with your little one as your shadow!
Despite the difficulty of navigating that situation, I knew the room really needed it. He was NOT having the idea of playing in his bedroom or the living room, so I ended up so a quick cleaning of the room with him in there.
Here’s a peak at the before:
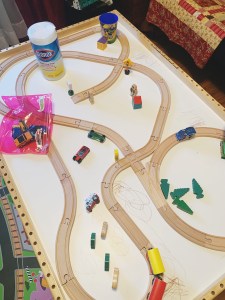
And, even more reason for me to clean that night – he had colored on his train tabletop! Some family friends, whose twins I used to babysit and now teach in our youth program, gifted us their train table when we moved into the rental, and AJ loves it. When I saw that he had gotten ahold of a brown crayon and scribbled all over the top, I’m fairly certain my eyes had popped, cartoon-style, out of my head.
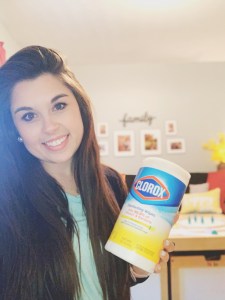
I was bummed on Tuesday because I hadn’t had a chance go grab a Magic Eraser, which is what everyone says to use on crayon markings. I figured I’d try to use what I had on hand – a container of Clorox Wipes. Y’all… You cannot imagine how easy this was to scrub up! All I did was apply pressure and scrub for a bit, and the crayon markings came right up!
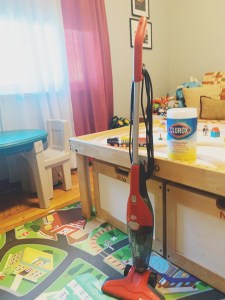
After that, I used Clorox wipes to clean up all of the surfaces – the train table, the TV and stand, the play kitchen, plastic table and chairs, and play tool bench. I then vacuumed with my second vacuum (yes, I have two – but I really believe that you really need a regular vacuum and a smaller one for quick cleaning on non-carpet floors) to quickly take care of floor cleaning and, popping the handle off and using the handheld middle section, to clean up the futon upholstery (y’all know that fabric-covered furniture is like a graveyard for goldfish crackers).
Even with my toddler talking to me and trying to play and watch Blue Clues as I cleaned, I was able to get the room clean in about 30-40 minutes!
While it certainly wasn’t my usual deep clean, it was a lot better than not cleaning and still certainly more in-depth than a midweek Lysol-spray and toy pick up. I felt super efficient and effective, and it only took about a half hour and two cleaning supplies!
If you have been following me on social media, you likely know that I am working on my personal wellness. (If you don’t follow me yet, shameless plug here: check out my Facebook, Pinterest, or Instagram today!)
I’ve been fairly open about my difficulties with the subject of personal wellness and health. A lot of my struggles have centered around body image and body positivity. In college, I went through an eating disorder. Then, after coming out the other side of that, I dealt with some weight gain and loss in patterns, often punctuated by emotional turmoil and stress in my personal life. After my divorce and once I settled into my rental home with my son, I started getting more aware of the positive body changes I was making and wanted to continue to make. I started reading up on at-home exercises. I made sure my daily diet always included protein, fruits, and veggies. I was at the lowest weight I’d seen since I got married in 2014, and I was really proud of myself for that positive and health progress.
Since then, I’ve grown even more active in my own wellness efforts. I’ve done wellness challenges with friends who are coaches, started tracking my calorie intake with the My Fitness Pal app from Under Armor, and bought a fitness tracking watch from LETSCOM.
One of the things I have been VERY clear with myself about from the get-go of my fitness journey is that I DO NOT want to limit myself on food that brings me joy. I’m a cook and a baker and a homemaker (and Dr. Seuss, apparently), and I do NOT want to limit the joy those areas of my life bring me on a regular basis. So, I’ve taken a serious interest in finding foods I love that are low-calorie so I can treat myself occasionally with peanut butter chocolate chip cookies, ice cream, poke cake, and fried chicken – you know, the essentials.
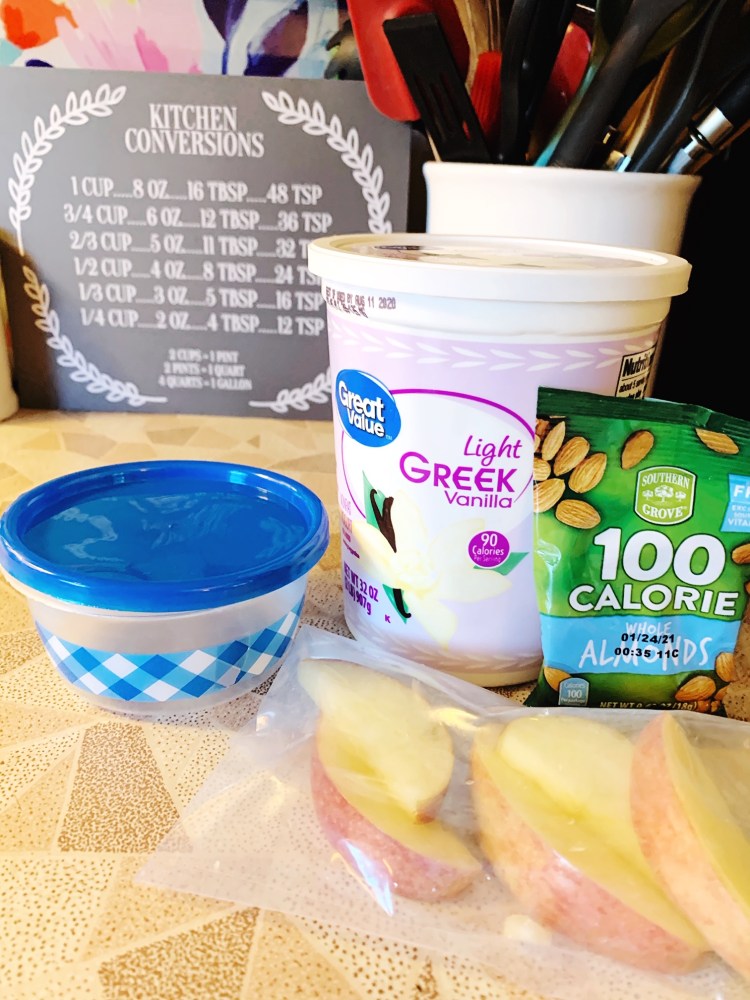
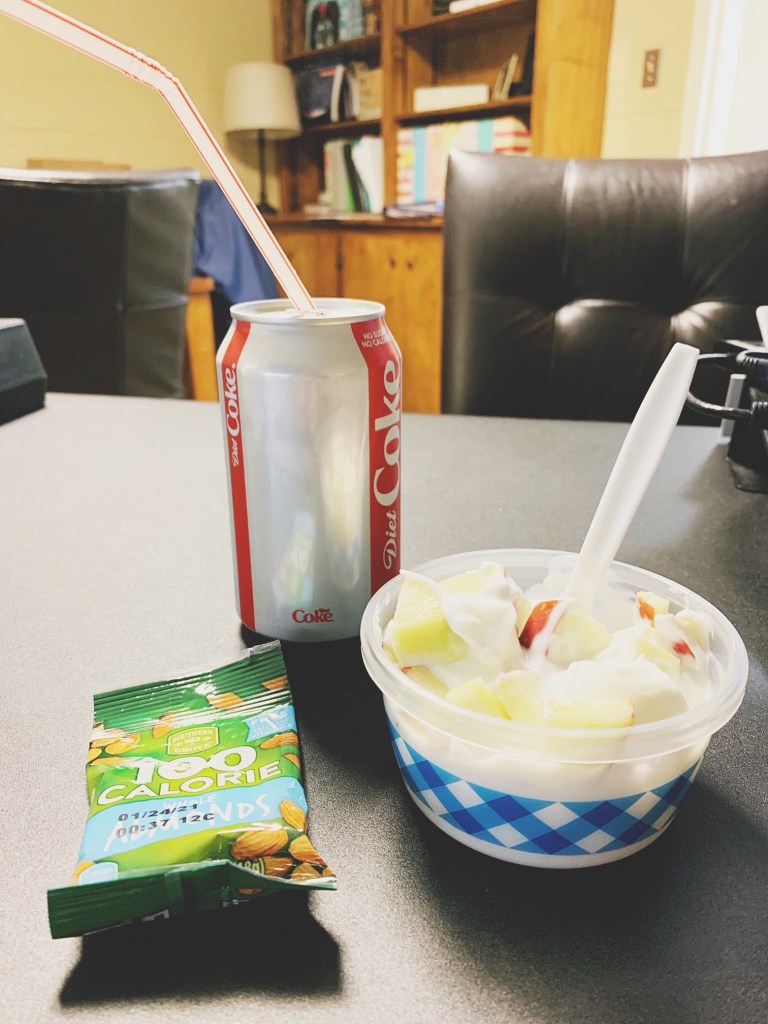
One of my FAVORITE low-calorie, healthy foods is my couldn’t-be-easier yogurt parfait! You can make it in minutes, and it can be a great breakfast or snack. I make mine in one of two ways: apple or strawberry.
Here’s what you need:
1 serving of light Vanilla Greek Yogurt (about ¾-1 cup)
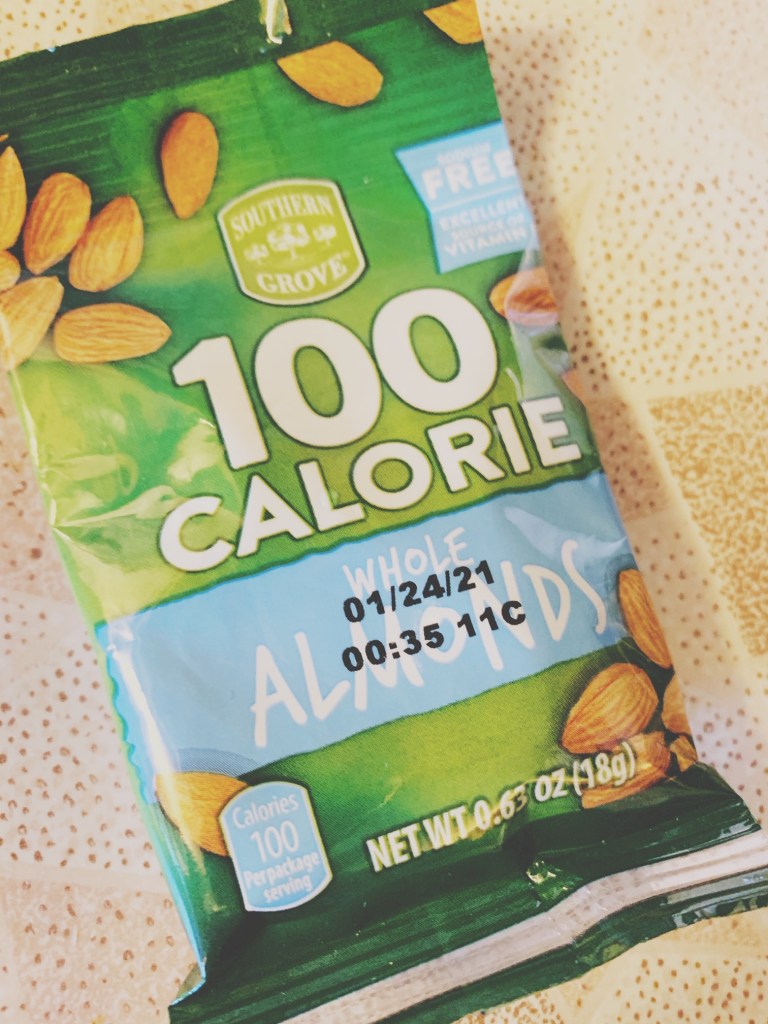
100-calorie serving size of raw almonds
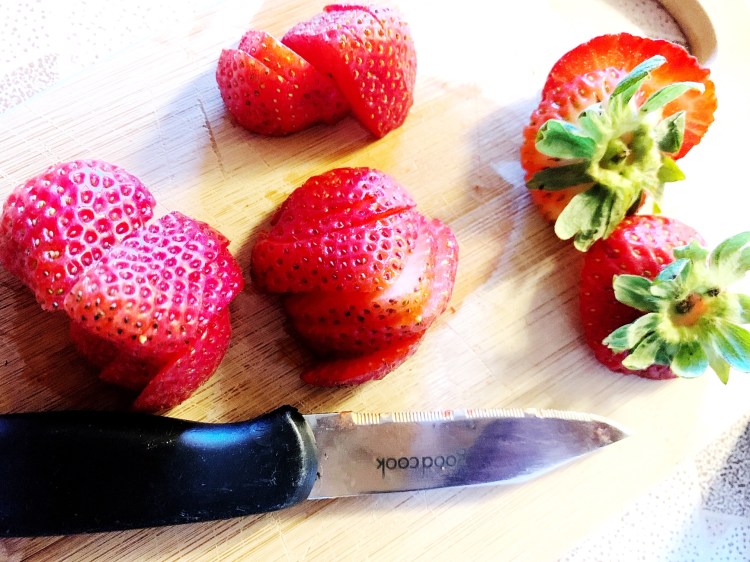
3 small or medium-sized strawberries OR 1 medium apple
I get my 100-calorie packs of almonds from Aldi. They’re inexpensive and pre-counted, which makes this process even quicker, if I’m throwing a parfait in my lunchbox for work.
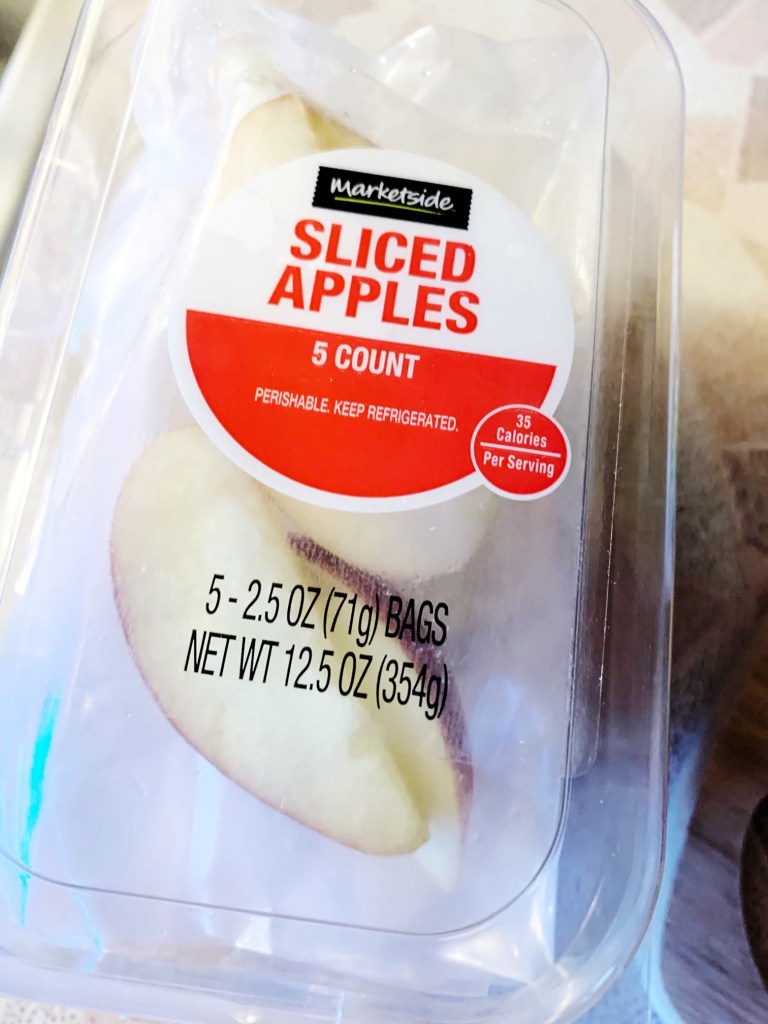
I also use the pre-packaged, sliced apples from Walmart. A medium sized apple will work, especially if you have an apple corer and slicer handy, but I’m packing two lunches most days, and it makes it WAY faster if it’s pre-cut and portioned for me.
To make your parfait, select your container. I use either a tupperware container (these cute ones are from Dollar General – 3 for $1, if I remember correctly) or a dessert dish, if you’re feeling fancy or setting the table with them!
Scoop in your yogurt. Cut your fruit – either chunk your apple into bite-sized pieces or slice your strawberries, and add them in. Then sprinkle on the almonds.
I think layering is nice, if you have the time, because it lets you get a little in each bite, but if you need to just throw it all in as you’re able, you’re probably going to stir with your spoon when you eat anyway!
Good news: the strawberry version is only about 196 calories and the apple version is only 285 calories. Breakfast or a snack for 200-300 calories sounds like a win to me – especially if it contains protein, a serving of fruit, and the many good things that come with yogurt!!
I hope you enjoy this super-simple, tasty snack or breakfast!
If you’re on your own wellness journey, could benefit from more recipes like this or topics of personal health, please comment below!
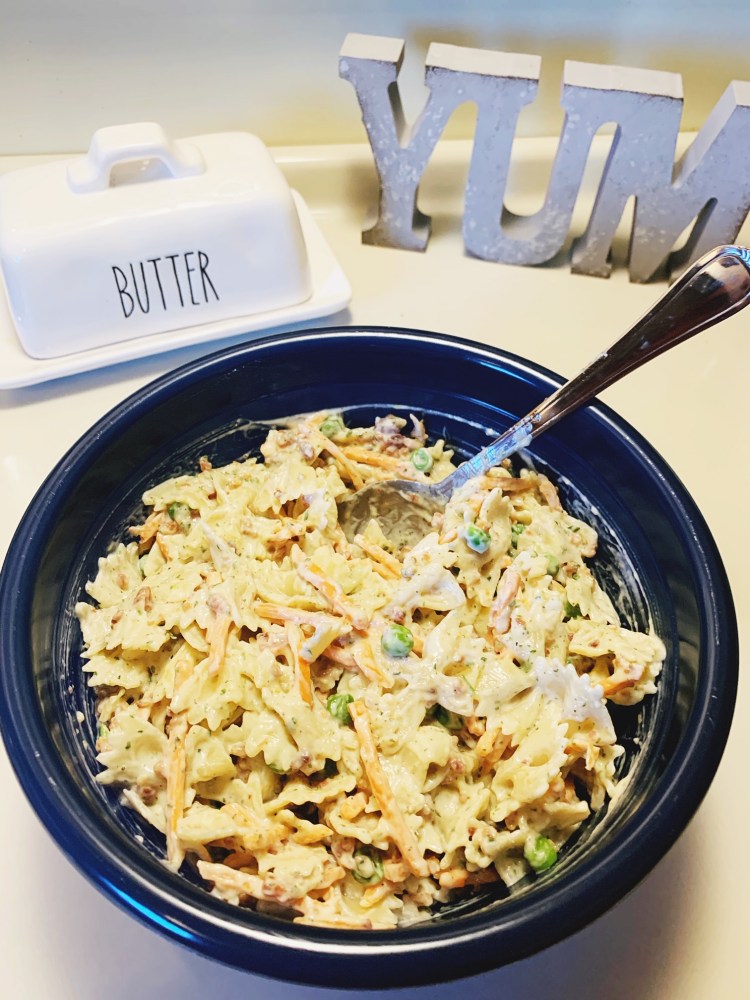
I love pasta salad! To be fair, I love carbs, so it might just be that I love pasta… but I do like veggies a lot too, and I really enjoy pasta salad dishes in the summertime. They’re the perfect compliment to a grilled hamburger or a BBQ sandwich!
Today’s recipe is just as easy! It’s a bacon ranch pasta salad!
Although I’m not a ranch fan usually, I do love ranch dip with vegetables and ranch pasta salad.
To develop a good recipe, I started dissecting pasta salads I’d try in delis or from boxed mixes, and this is what I’m come up with for my own homemade version.
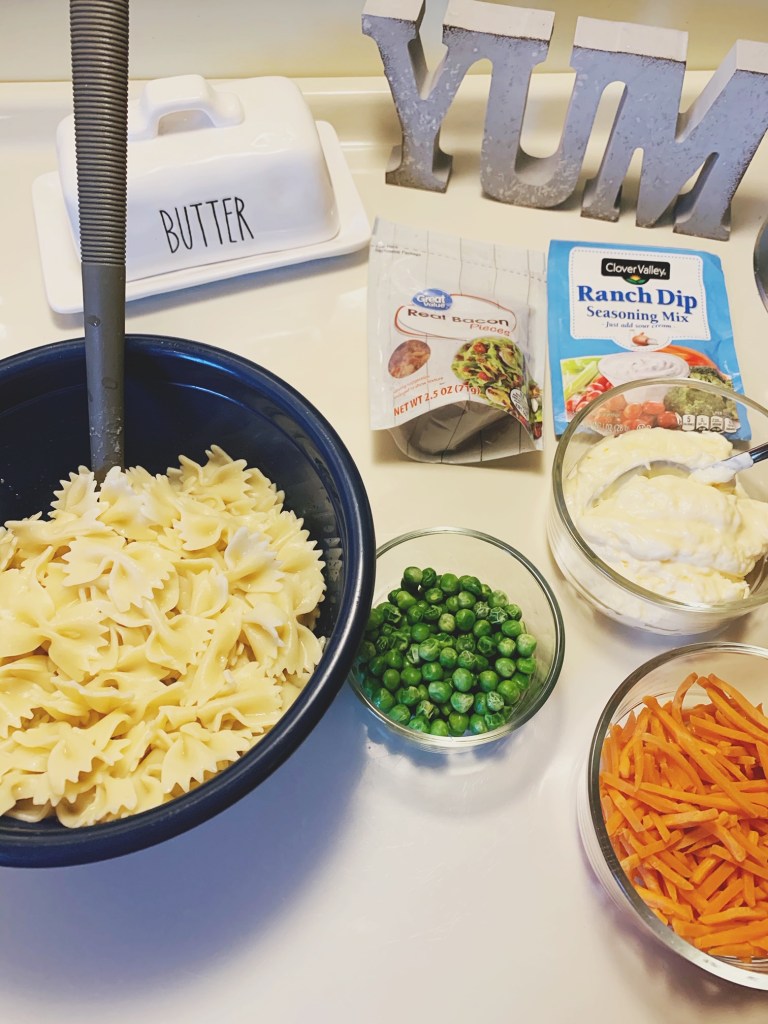
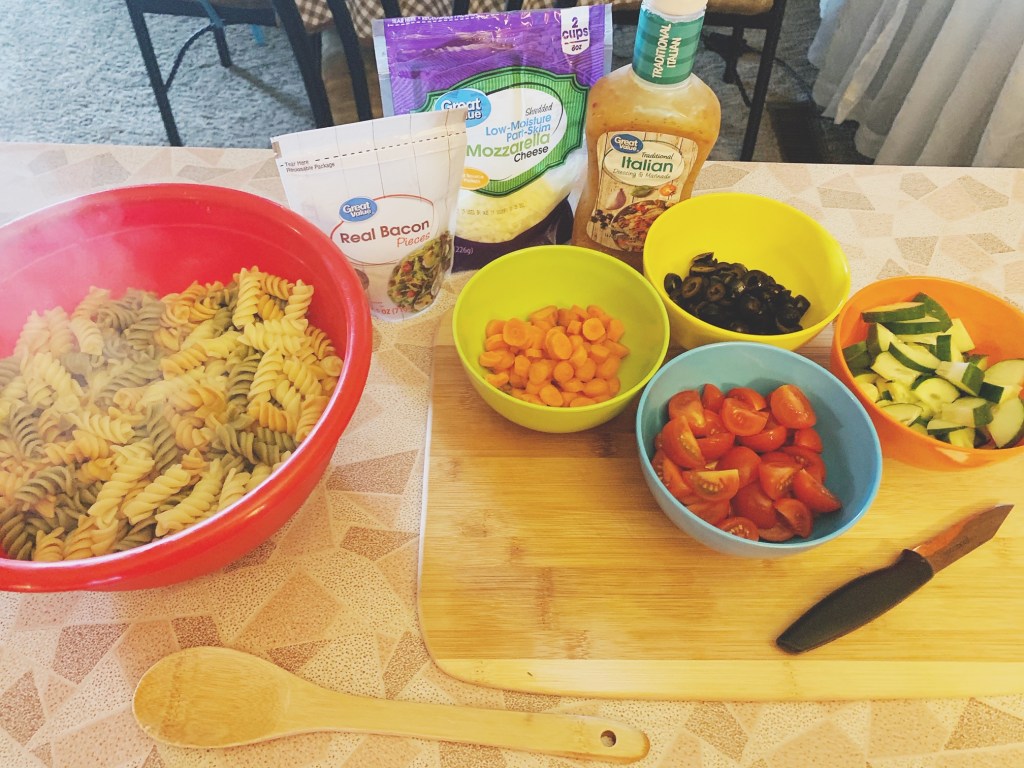
For this delicious dish, you’ll need the the following:
4 cups of bow tie pasta
1 cup matchstick carrots
1/2 cup sugar peas
Approx 1 1/4 cup mayo
1 pack of real bacon bits
1 pack of ranch seasoning
First, you’ll need to boil the noodles.
While noodles are boiling, measure out all other ingredients. If your peas are frozen like mine, steam in the microwave for 2ish minutes.
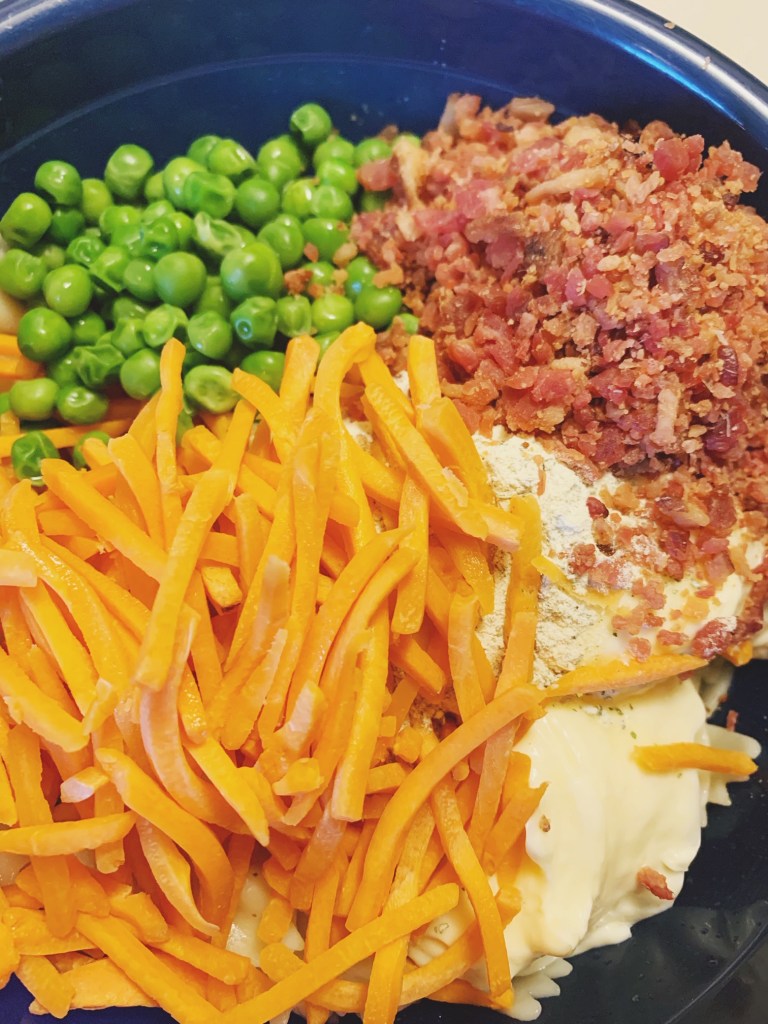
When the noodles are done, drain and rinse in a colander. Put the rinsed cooked and noodles in a big bowl.
Now, add all ingredients and stir until well covered. When you begin to stir, you’ll want to make sure that the ranch seasoning packet and the mayo both end up dispersed throughout the dish.
Chill until serving. Enjoy!
PS: If you serve it several hours after making it, I advise that you add a little extra mayonnaise and stir before serving. This will ensure that the pasta salad has the right texture and fresh taste!
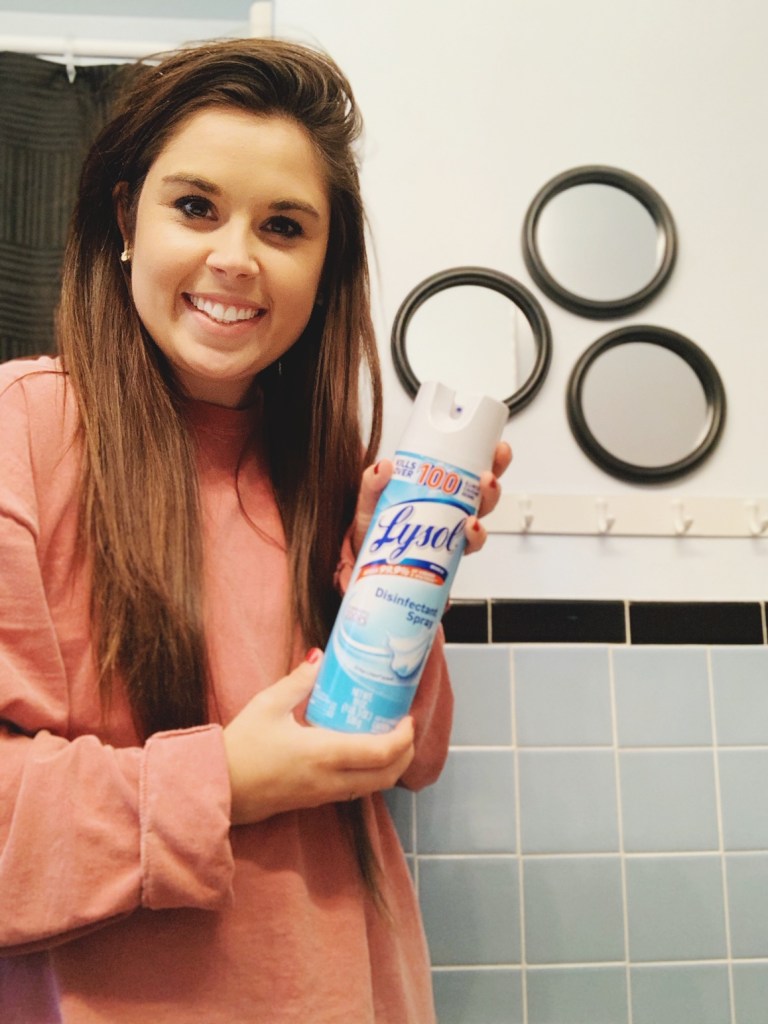
With COVID-19 hitting the entire globe the past several months, health and cleanliness have been buzzwords and hot topics. But I’m of the firm belief that they should be buzzwords all the time – pandemic or not!
The reality is that we all have areas that we forget to clean – or that are so small that we forget to scrub them when we’re doing our regular cleaning. But there are some areas that deserve attention ALL THE TIME.
You know the bathroom has to be one of the most important places to clean in your entire home. It’s not enough to just clean it occasionally – it needs regular attention.
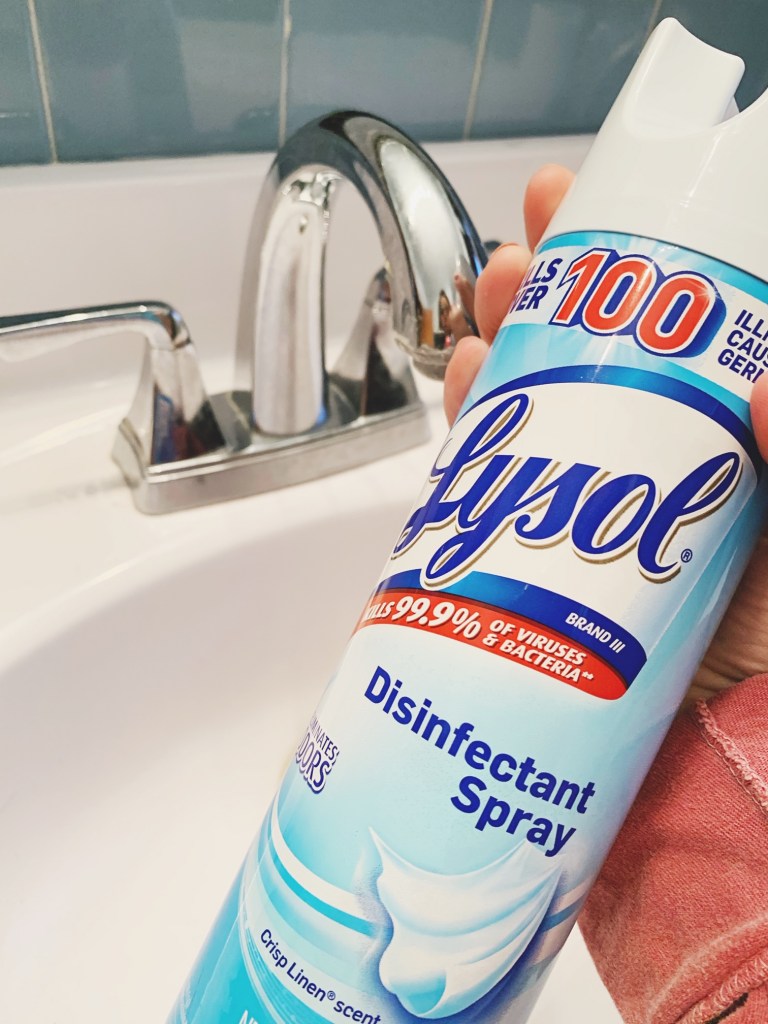
Here are 5 places that should get regular attention in your bathroom – but are likely to be overlooked when you do your usual tub, toilet, and sink cleaning. All you need to sanitize these spaces regularly is a bottle of Lysol (or other disinfectant spray if you prefer another brand).
#1: The Toilet Handle
This is a disgusting part of the bathroom. Let’s be real – most people flush before they wash their hands. It’s important to spray down your toilet handle regularly – daily doesn’t even seem too much to me!
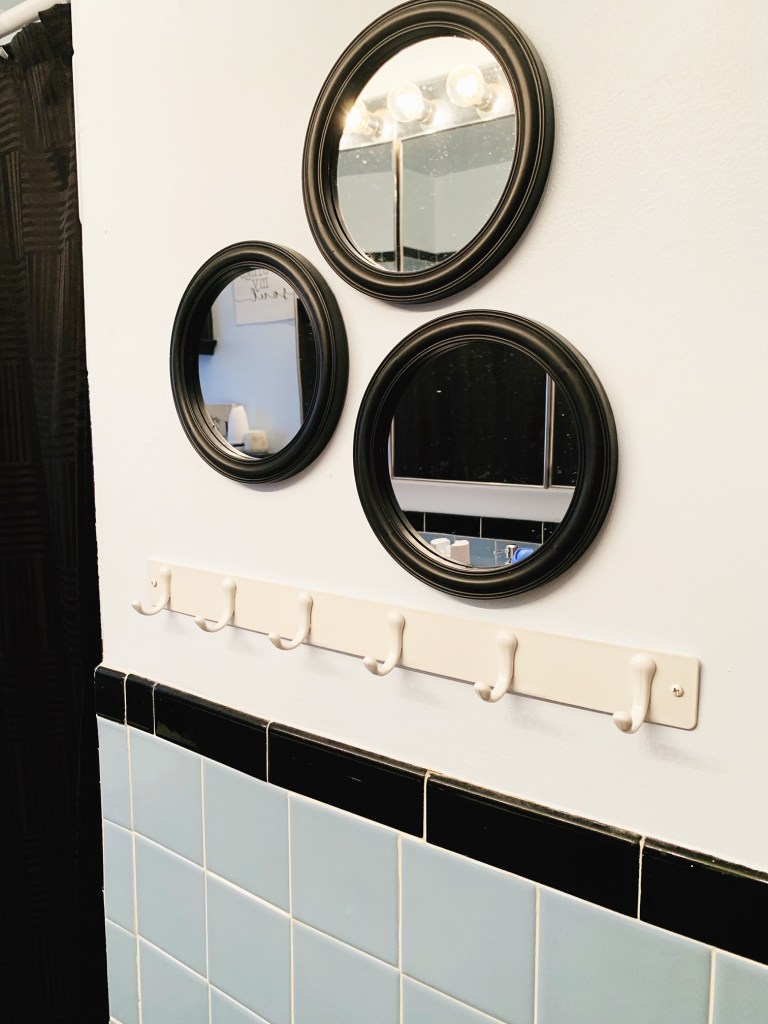
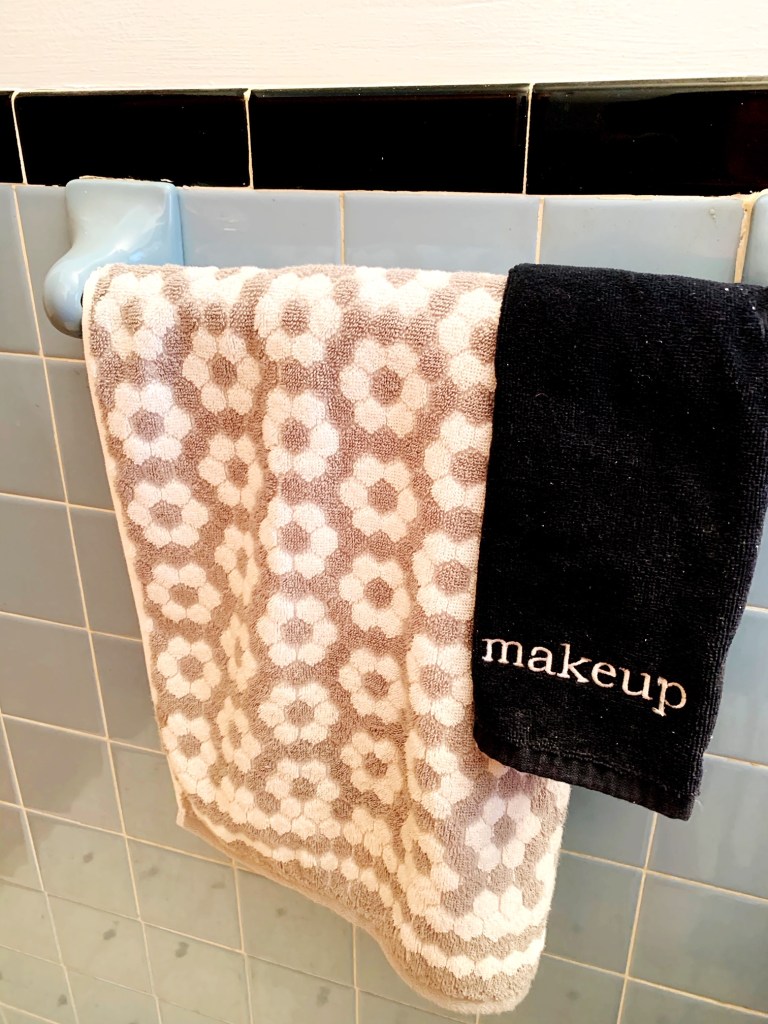
#2: The Towel Hooks & Bar
No matter which you have – or if you have both – this is a place that gets some serious attention from bathroom users. Even if they’re grabbing their towel after a shower or drying their hands after a wash, there are still a lot of skin cell passing opportunities in these interactions, so I’d venture a guess that it’s worth a spray a couple times a week.
#3: The Faucet Handles
Again, people have to touch the handle BEFORE they wash their hands. It’s gross, but true. Spray the handles down regularly to avoid any extra germ or funk transfers.
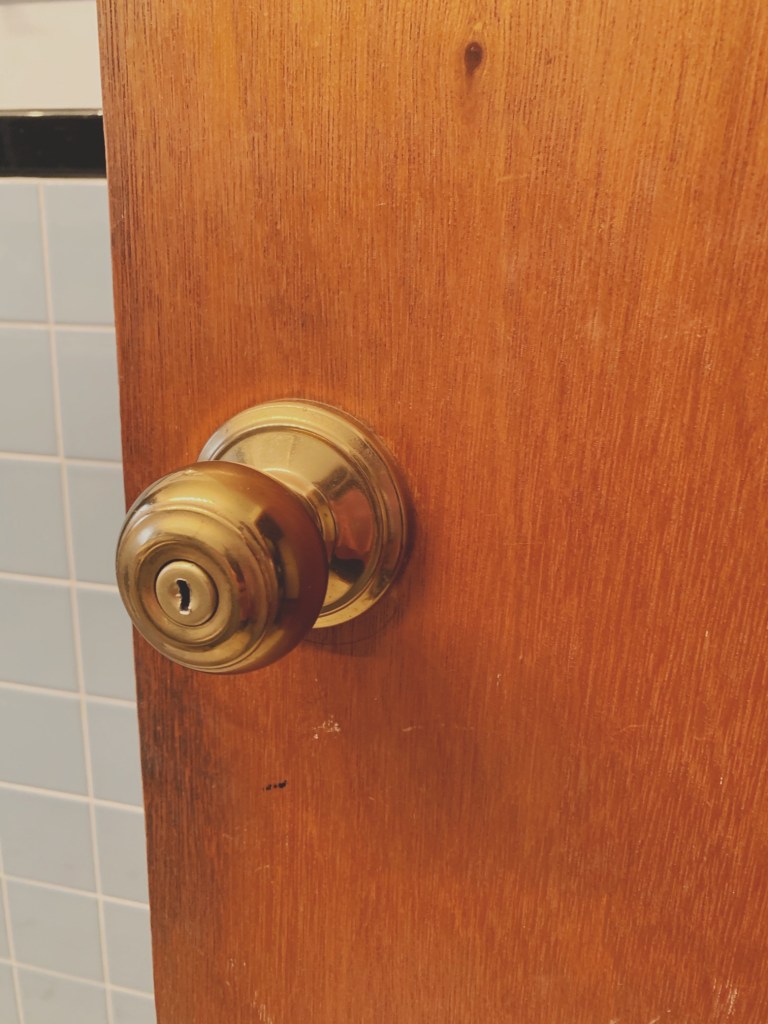
#4: The Door Knob
Bathroom users touch the door knob twice – once coming in and once going out. Even if you are grace giving enough to assume that everyone washes their hands, we still don’t know what they may have touched BEFORE they entered the bathroom. Did they pick their nose? Did they change a dirty diaper? Were they playing in the sandbox? (Can you tell I’m a toddler mom?) You get the point: spray your door knob – inside and out!
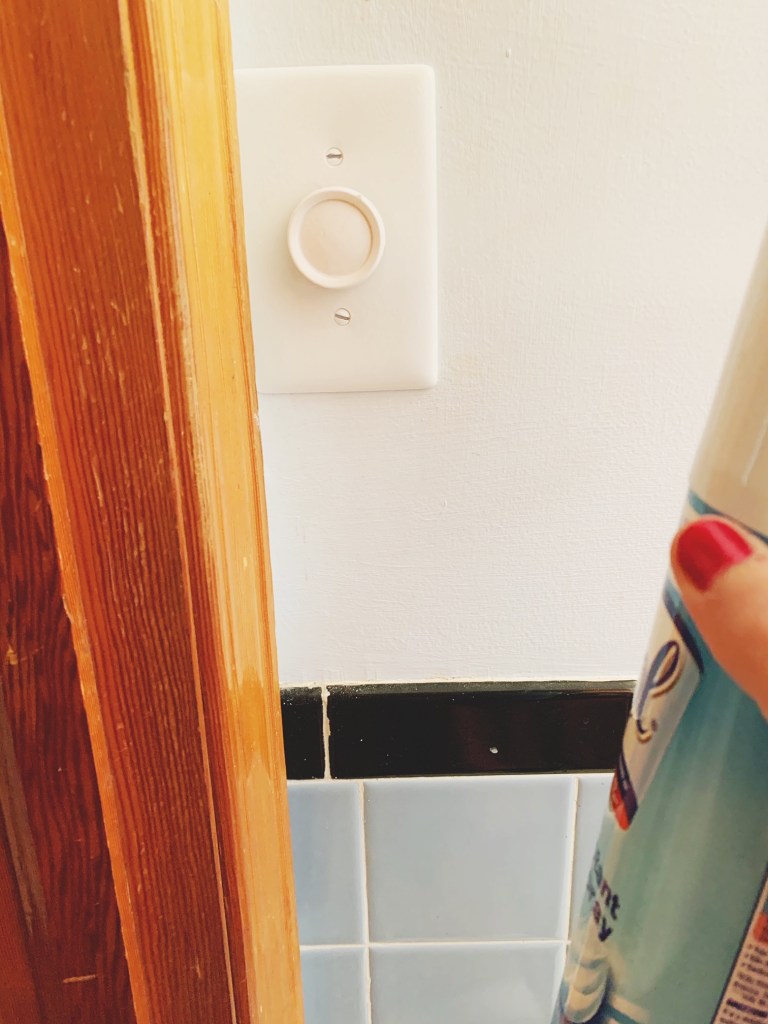
#5: The Light Switch
Similar to the door knob, most people are going to touch the light switch twice – entering and exiting the washroom. The light is needed a lot more than just for potty use, too – just a trip to wash hands, brush hair, or apply makeup could require a light switch interaction. A ton of touch points are here, so, like the toilet handle, daily spraying doesn’t seem like too much here either.
What other spots do you disinfect regularly in your bathroom – outside of regular tub, sink, and toilet bowl cleaning? Comment below!
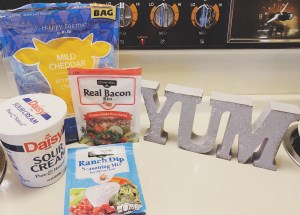
If you are tired of being asked to bring napkins or ice to weekend cookouts or family holidays, I have the perfect solution for you! My cheesy bacon ranch dip and a fresh veggie tray are the absolute perfect way to impress without needing too many ingredients or too many kitchen skills!
This recipe just calls for:
16 ounces of sour cream
1 packet of dry ranch seasoning
1 packet of bacon bits (real, not imitation if possible)
Approx 1/3-1/2 cup shredded cheese
You’ll want to have veggies or other dipping foods, like crackers or pretzels, as well.
First, put your sour cream in a larger glass or mixing bowl. Heat up your bacon bits in a skillet on low or in the microwave until heated but not frying (no need to re-cook, just reheating here).
As your bacon heats, go ahead and stir your ranch seasoning packet into the sour cream. Mix in the ranch seasoning, then add in most of your reheated bacon bits and most of the cheese, saving a few larger pieces of bacon bit and some shredded cheese for the top – presentation is everything!
You can refrigerate the dip in the mixing bowl for the next bit.
While your dip is chilling in the fridge, go ahead and prepare the dip-able items. There are a ton of options here: you can go as simple as grabbing just a bag of baby carrots and celery stalks at the grocery store, you can get a wider selection of seasonal veggies to chop up, or you can combine veggies and pretzels and/or crackers for a more diverse sampling. If you’re looking for a quick, cost effective dish, I suggest a bag of pretzels (about a buck or two) and a bag of baby carrots (less than a buck in my local grocery store). If you’re looking for ease, you can grab a pre-made plastic tray of veggies from your supermarket of choice and replate it with your dip.
The real secret is in making sure that your dip and tray look extra presentable! Find a cute plate or a nice sectioned serving platter or tray, and your contribution to the potluck, cookout, or holiday table will look delicious and thoughtful!
Go ahead – tell your Fourth of July hostess that you’re bringing veggies & homemade dip. I promise you (and the rest of the cookout crew) won’t regret it!
This gift is simple, but it’s also one that can be really sentimental. It freezes your little one’s tiny handprint from this year in paint forever!
Simply get a piece of cardstock (or even just construction or printer paper), dip your child’s entire hand in one color of paint, and press their handprint down into the middle of the page. I actually use half sheets for mine, since I wanted them smaller and more proportionate to my little one’s hand.
After you have the handprint done, you’ll want to wash that hand off quickly (yikes) and then write your message in marker or crayon. I opted for “High Five, Dad” and “High Five, Pop-Pop” because my two year old is counting now, and I thought that was a neat thing to capture in this piece along with his current handprint size. I’m sure there a ton of other cute phrases you can use, like “Hands down, you’re the best Grandpa” or something similar.
I did two of these – one for my dad, who is the world’s best Pop-Pop, and one for my son’s father. I’ve mentioned before on this blog that my son’s father and I are divorced, but I’m in the business of raising a thoughtful little boy, and, to me, that means setting aside whatever happened between us and teaching my son to be a giver. So, we made handprint art for Father’s Day for my little man to gift to his dad.
#2: At-Home Cookout
If your dad is the hardest to buy for – or if you have dads and grandpas and uncles galore and need something to give to all of them – I suggest a backyard cookout! Dads typically aren’t picky – at least in my experience – and the thought seems to be what really matters. So hamburgers or hot dogs are probably fine, but I’d suggest adding a homemade item or two to make it extra delicious and thoughtful.
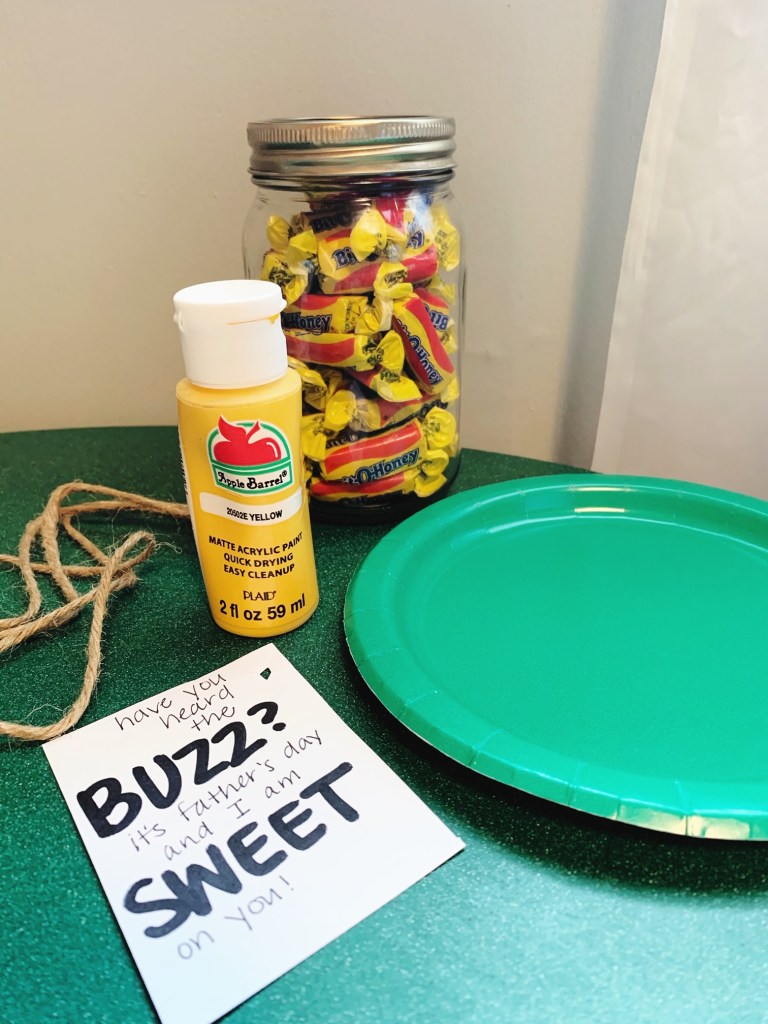
My dad likes those Bit’o’Honey candies, and no one else in my family does. (Because they’re SO sweet and sticky!) This is a gift just for him that only he will enjoy – and he can take it work and stick it on his desk, or he can put it in the garage on his work bench to enjoy for the next few weeks (or days, if he gets snacky).
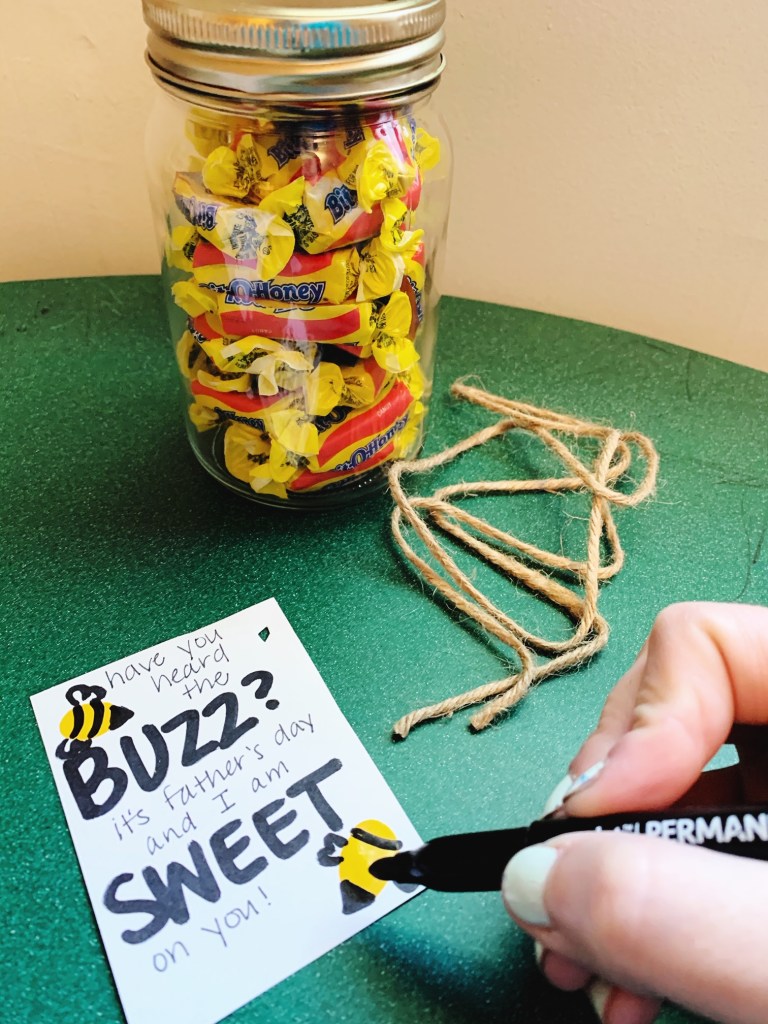
I got a mason jar, two bags of Bit’O’Honey candies, twine, and a piece of cardstock. First, fill up the jar with your candy and tighten the lid.
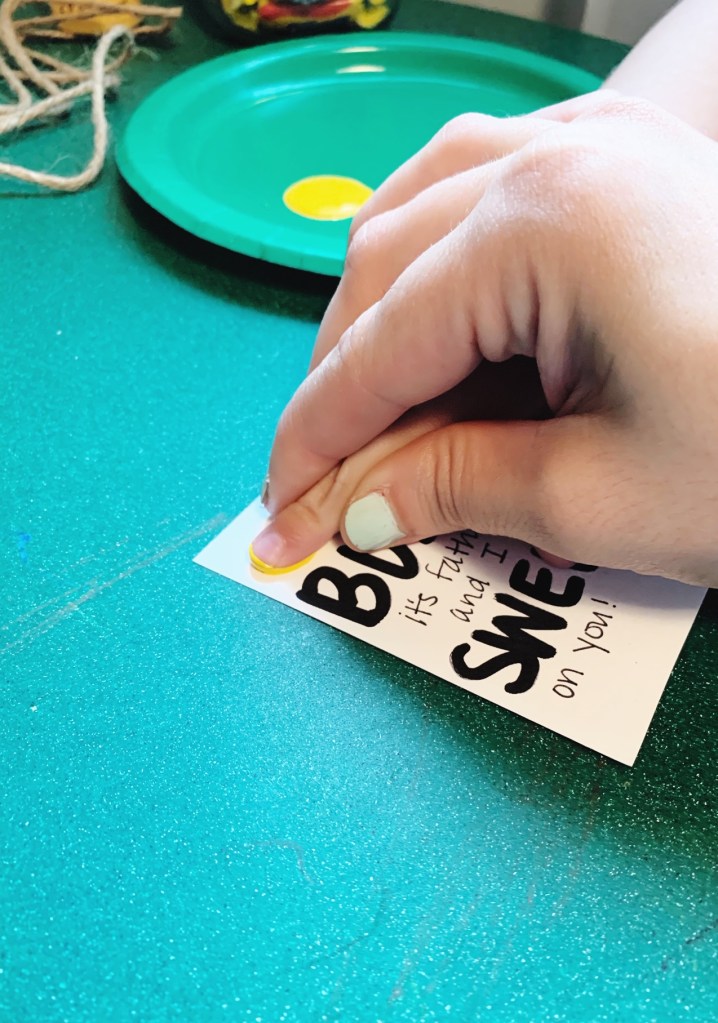
Next, on the cardstock, I pre-wrote a message that correlated with the candy: “Have you heard the buzz? It’s Father’s Day, and I am sweet on you!” I then dunked my toddler’s index finger in yellow paint and make two yellow fingerprints in open areas on the card. After letting them dry, I used black marker to turn them into little (and imperfect) bumblebees. I punched a hole in the corner of the card, used the twine to fasten it onto the jar with a simple bow.
I think this is going to make the perfect little gift for Pop-Pop!
What DIY gifts do you give to the dads, grandfathers, and other important men in your life on this holiday? Share in the comments below!
As a momma hen of an imaginative two-year-old boy, it’s been important to me to provide my little one with toys that are both age appropriate and allow for him to use and expand his creativity. However, as a single momma hen, I am on a fairly strict budget each month. Dollar Tree has, of late, really provided some solutions for me!
I’m going to share my three top toddler toy picks with you today!
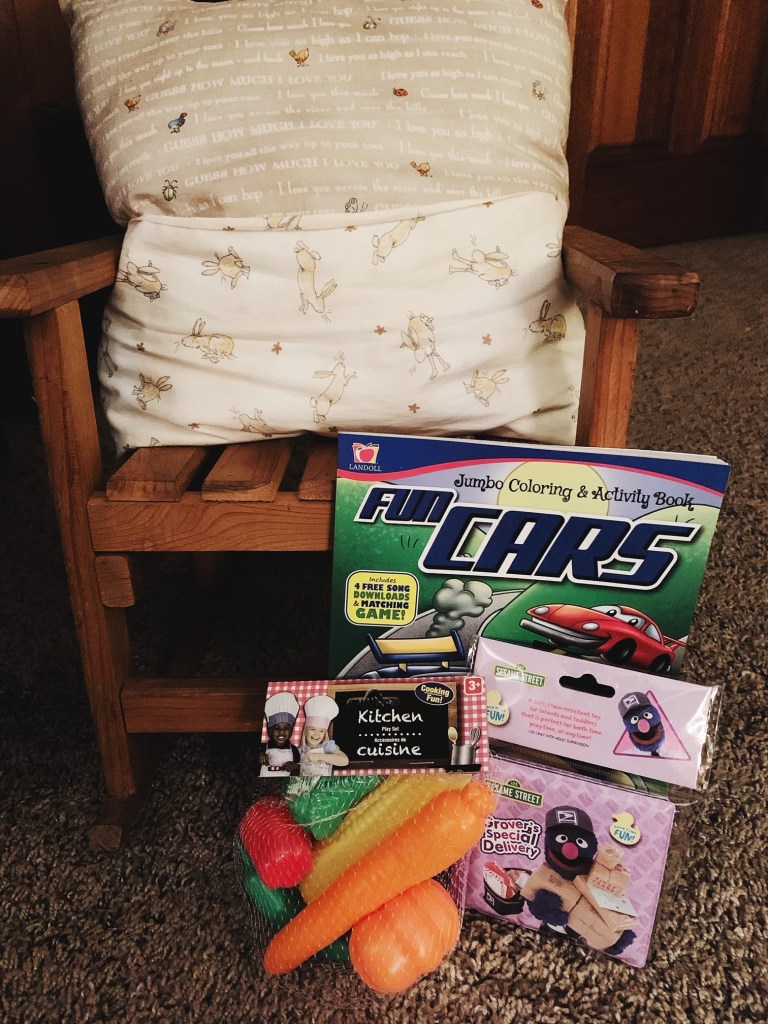
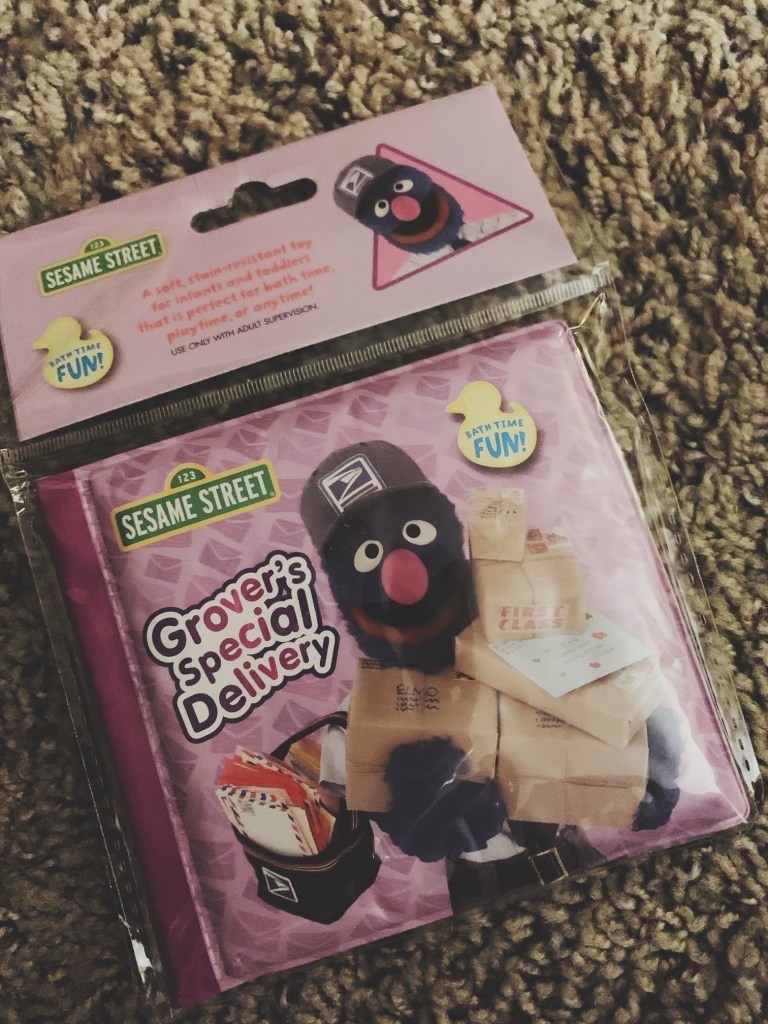
#1: Bath Books
If your toddler is still teething (ugh can we just get these teeth in, please?!) or if your toddler loves playing in water, bath books are a great solution! These are NOT just for infants – these are perfect for toddlers who are gnawing on toys because of teething pains, who are slobbery from teething (the drool is REAL, y’all), or who are a little fussy when first put in the bath. They’re also a great baby pool toy!
Dollar Tree’s bath books are, of course, a dollar, and they have various characters. Grover is my favorite Sesame Street character, so this is my most recent purchase for my little one, but we also have Lion King, Mickey Mouse, and Elmo. There are a TON of options! Just remember, they are in the “baby” section of the store.
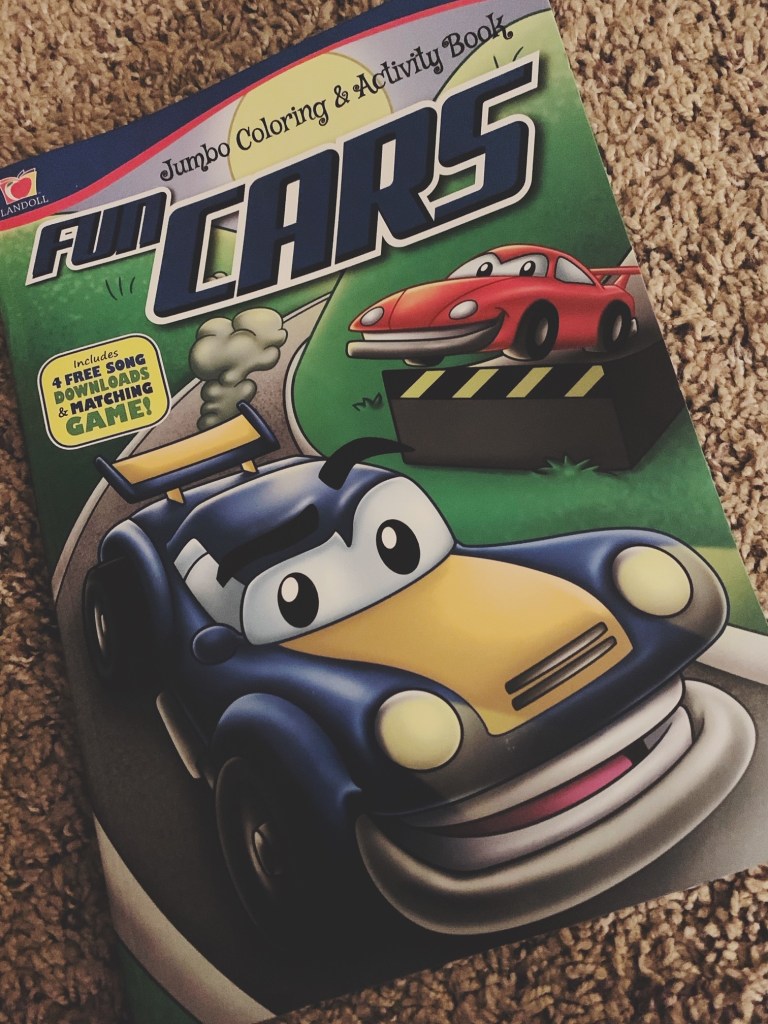
#2: Coloring Books
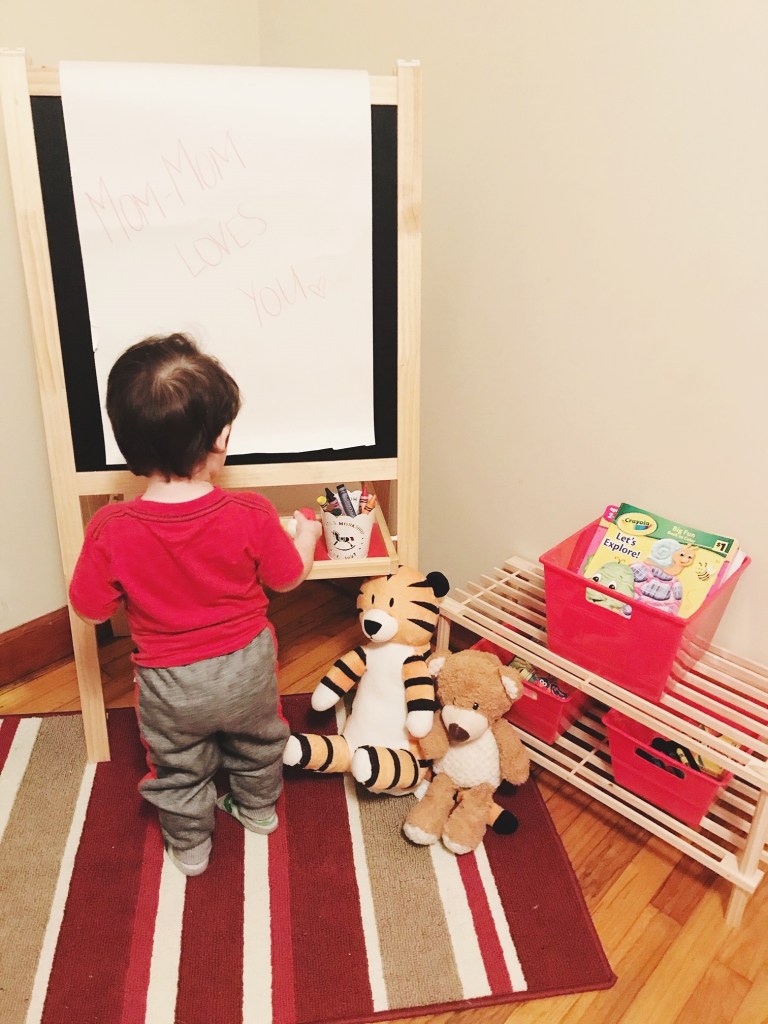
My little guy LOVES crayons, stamps, and markers! We have a LOT of art supplies (even a full art corner in his room, see below), and we love creating together (check out this list of DIY items we did for Mother’s Day).
I’ve found that if I have to work on a separate project – dishes, laundry, cleaning, grad school homework, or working from home), I can always give him a coloring book and it’ll keep him busy for about 30 minutes or more!
Dollar Tree does NOT disappoint with a wide selection of options. They do offer a LOT of character-based coloring books, so if your toddler is really into Elsa or Mickey or Paw Patrol, there are a ton of options. I sometimes like to get the non-character-based ones, as they seem to have larger coloring areas that might be a little more age-appropriate for a two-year-old boy. But let’s be honest – he definitely has a Paw Patrol coloring book because he loves Chase and Marshall!
Dollar Tree does often have the larger sized crayons too, if you’re the market for an affordable box.
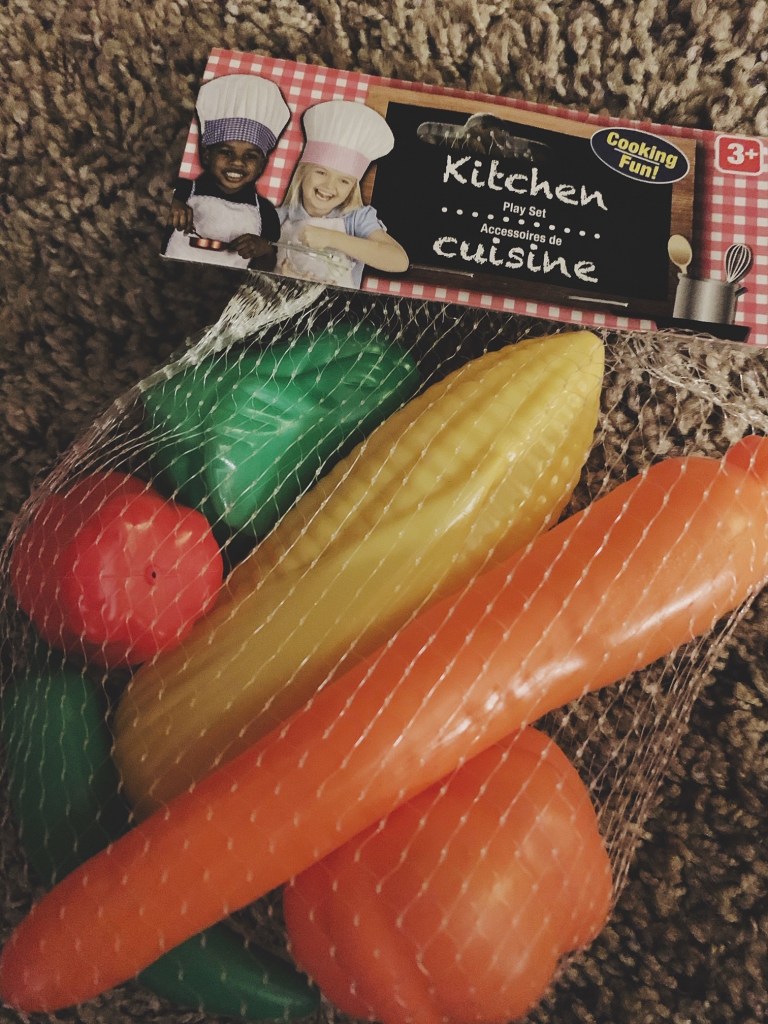
#3: Play Food & Kitchen Supplies
I am a firm believer that playing pretend builds imagination, creative thinking, and skill development. I believe that children learn best through play.
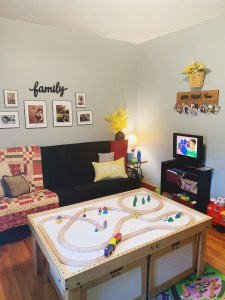
My rental belonged to a woman who had several grandchildren, and she had designated one room as a playroom. I have since done the same – designating that same room as my little man’s playroom (complete with a futon in case it also needs to act as a guest room in the future). In that room, there was a kid’s play kitchen that my landlords offered to leave for my little one to use – and boy, does he use it! He plays with the kitchen nearly daily, and he loves to pretend to make coffee, to bake cookies, and to mash potatoes. He really has taken hints from all that the grown ups in his life do and wants to mimic those actions, and it’s really neat to see him play “house” in his own way.
There were a few kid-sized plastic pots and a few plastic food items left with the play kitchen, but I wanted to make sure I was helping to further foster this interest. I started looking up play food – and that stuff can get expensive with toy retailers and big box stores! I was at Dollar Tree in the card aisle (y’all should seriously get your cards there – 2 for $1 and they have name-brand options), and I turned to see the toy section behind me. I was SO surprised to find play food and utensils! You can get a bag of plastic vegetables, fruit, or utensils for just $1 each! This is a huge savings compared to larger retailers, and my little guy has had so much fun with these!
What toddler-appropriate toys have you found for your kiddo(s) at Dollar Tree? How do you support your little one being imaginative? I would love to hear from you in the comments below!