Crock Pot Chicken Noodle Soup

A hot bowl of soup may seem like a winter food to many, but I’m the kind of girl who doesn’t think that food has to be limited to seasons. I can eat ice cream in the middle of winter with a hoodie on while I binge watch Netflix. I can drink a mug of hot cocoa barefooted on the front porch in a pair of shorts and tank top in the summer. And I can eat a cup of soup with a grilled cheese or a warm loaf of Italian bread any day. I’m a strong believer that, if you like it, a dish shouldn’t be limited to certain months on the calendar.

And if I happen to be feeling under the weather, I want chicken-broth-based soup no matter if it’s a cold winter evening or a bright summer day. Plus, there’s nothing like the smell of warm soup to make your kitchen feel cozy!

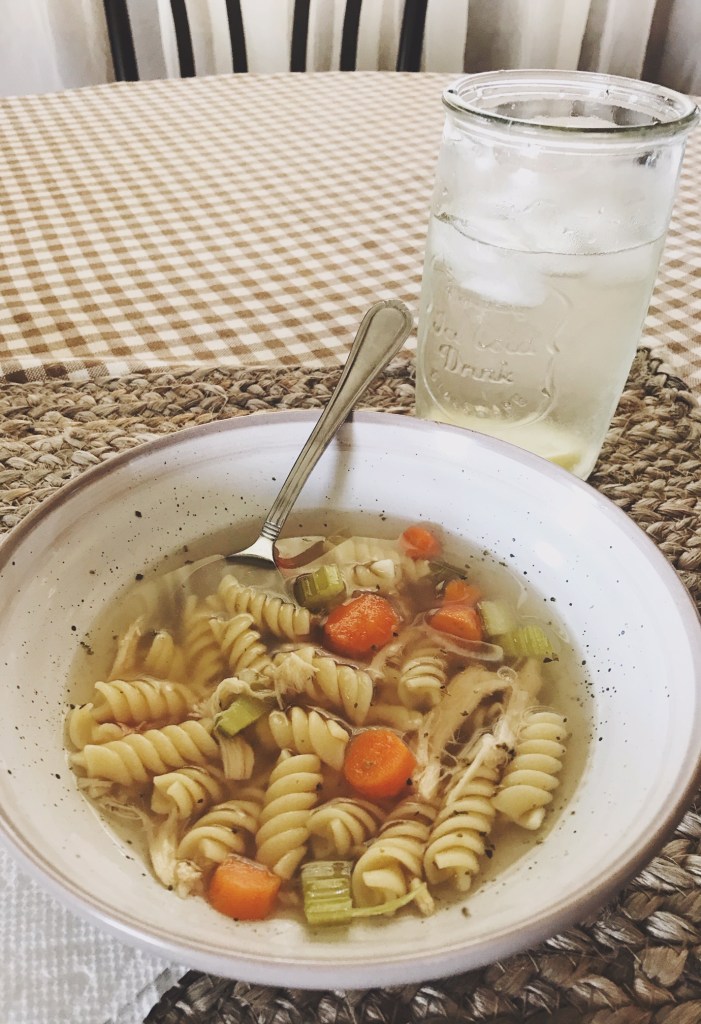
My chicken noodle soup is so easy to make that you will hardly believe it could possibly taste as good as it does.

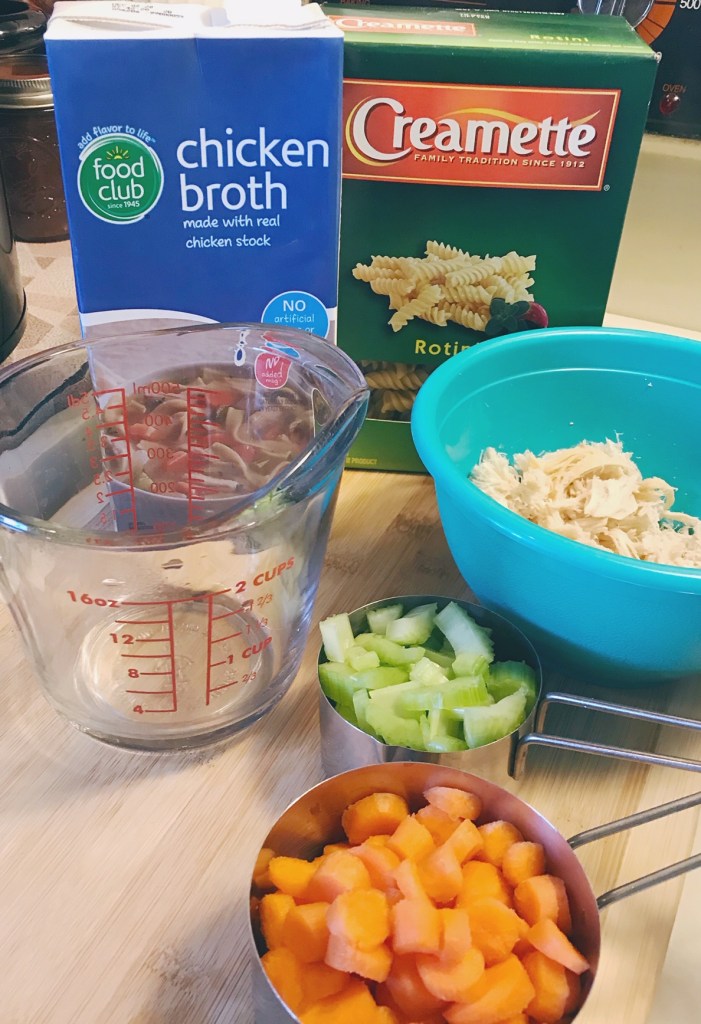
Here’s what you need:

  • 1 frozen chicken breast
  • 2 cups of rigatoni noodles
  • 4 cups of chicken broth
  • 1 cup of chopped carrots
  • ½ cup chopped celery
  • a dash of Italian seasonings
  • a pinch of salt & pepper

Put your crock pot on low and cook your chicken breast for four hours, keeping an eye on it to make sure it doesn’t get overdone. (Tip: if you put it in frozen, as it thaws, water will form, and you won’t need to add any water to your crock pot!)

Near the end of your four hours, go ahead and chop your carrots and celery and measure out your noodles and your broth.

Upon the four-hour timer, shred your chicken with a fork (or, if you find it easier to use dueling forks, double up and shred the chicken from the middle pulling outward). Once the chicken is shredded, add in your other ingredients – except for your noodles and spices. I like to dump in my veggies before I add in the broth, so the chopped vegetables don’t cause a splash.

Keep this mixture (still no noodles) in the crock pot on low for another 2-3 hours.

Cook your noodles on the stovetop as normal. Drain in a colander and rinse, then add the cooked noodles to your crock pot. Stir really well to ensure that your veggies and chicken get intermixed with your noodles. At this point, sprinkle and stir in salt, pepper, and Italian seasoning to taste. Personally, I like a lot of Italian seasoning and just a small pinch of salt and pepper.

Keep this full mixture in the crock pot for another 30-45 minutes. I suggest taste-testing a carrot to make sure it’s the texture and softness you want before serving. Stir well to make sure you get a little seasoning in each dish and every bite!

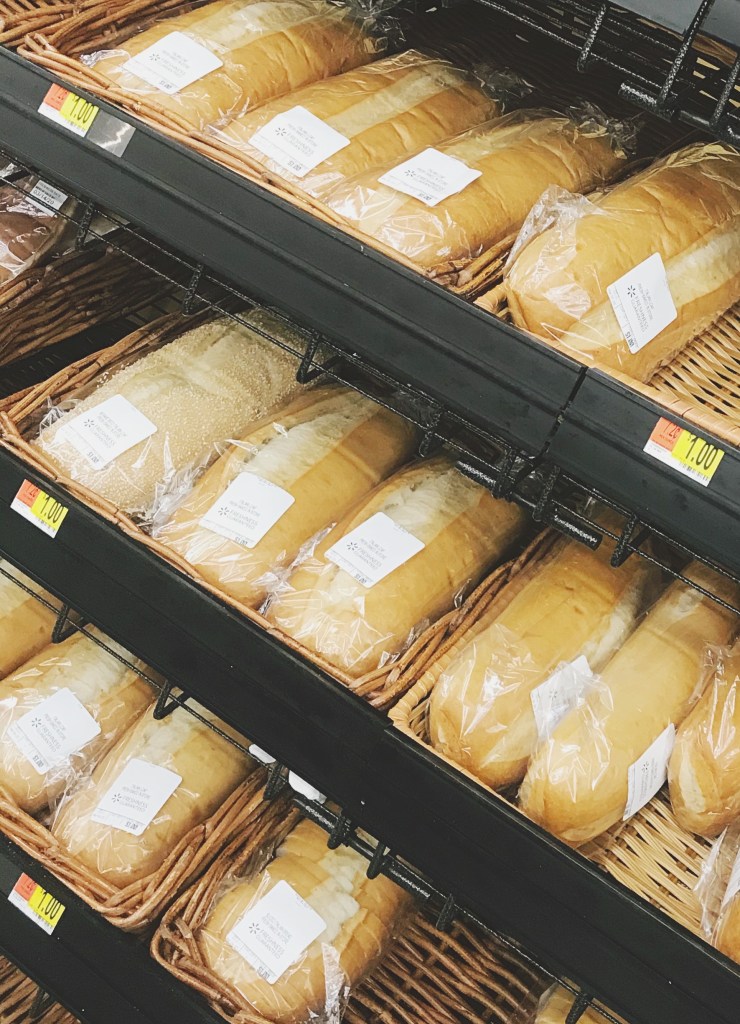
I also really like to buy a loaf of baked Italian bread to serve with my soup – especially if I’m serving it to more than just myself. I slice the bread (or by it pre-sliced) and then wrap it in tinfoil and put it in the oven to warm it, then serve with butter. Another delicious option is to slice it, lay pieces out on a baking sheet, drizzle olive oil on top and sprinkle on some Italian seasonings, and warm before serving.

I hope you enjoy this homemade chicken soup recipe – no matter the season!

Homemade Meatballs

I am a huge fan of all foods Italianate! I love meatballs – in pasta, in a sub, as an appetizer. So I decided to try homemade meatballs recently.

I was terribly nervous because everyone says that meatballs are so similar to meatloaf – and, confession: I’ve never made a good meatloaf. They always fall apart. And yes – you’re probably itching to comment that I should use more egg, or more this or more that. Y’all, I have tried SO MANY recipes. I can’t make one that stays together and tastes just right. Not even my momma’s recipe.

But – all that is about to change. I’m going to brave a meatloaf one day soon because these meatballs turned out SO YUMMY. And if a meatloaf is supposed to be anything like meatballs, then I should at least be able to come up with something half decent. I’ll keep y’all posted.

Anyway, back to the meatballs! I decided to try them out for the first time. Here are the ingredients I used.

  • 2 pounds of ground Italian sausage (thawed, not frozen)
  • 2 large eggs
  • ¼ cup milk
  • 2 cups of Italian breadcrumbs
  • 1 tablespoon of Italian seasoning
  • 2 teaspoons of chopped onion flakes
  • 2 teaspoons of garlic powder
  • 1 teaspoon of red pepper flakes
  • 1 can of Hunts traditional tomato sauce

Preheat your oven to 400F.

Set aside the thawed sausage. First, mix your wet ingredients in one bowl and your dry in another. Put your sausage in a really large mixing bowl, breaking it up as you go. Then, slowly pour the wet ingredients on top of the meat, followed by the dry ingredients. Using your (very well-washed) hands, knead the meat, working in the mixture of other ingredients. At the conclusion, you should not see large clumps of any of the seasonings or breadcrumbs – everything should be fairly well dispersed.

Roll into balls, approximately ping-pong sized. Spray a baking sheet lightly, then put in your preheated oven. Cook at 400F for 40 minutes.

Towards the end of your 40 minutes, heat your sauce on the stovetop in a pot. I found that although I usually season my sauce myself, my meatballs had enough flavor that leaving the sauce as-is worked perfectly.

When the meatballs are done, spoon them into the sauce and stir.

Serve on wheat hoagie buns, on pasta, or as an appetizer! Enjoy!

The red pepper flakes do give the meatballs a bit of heat, so if you’re not a fan of slightly spicy foods, I would recommend cutting that down some.

If you serve these with pasta, I would recommend additional sauce.

Affordable Closet Organization

We all have a spot in our houses (or many, many spots) that is a total DISASTER ZONE.

I’ll be honest – I have two personalities when it comes to cleaning and organization.

#1 – The slob my parents saw while raising me. The Barbie graveyard in the basement playroom, the dirty clothes heaps, the unmade bed… Enough to give me a nightmare as a mom now. My poor, poor parents.

#2 – The daily-to-do-list-making employee, the tab-organized-binder-maker for every project, and the every-toy-has-a-home-in-a-basket mom. I got frustrated at work one day and said “Weigel’s is hiring – I’m going up there,” and one of my staff members and friends said, “it’ll be the cleanest gas station in the county.”

These two different cleanliness personas don’t seem to match – until you open a closet.

Y’all, the closet situation… It’s real. And it’s bad.

I had a meltdown over it. So then I had to clean it.

Here’s the [very embarrassing] before picture. I actually forgot to take a before picture and this is it after I pulled a few things out and into the floor space in front of the closet. So an almost-before picture.

You can tell I was already planning to do SOMETHING with my closet space – because I’d already purchased my favorite inexpensive hangers when I moved into my rental. The neurotic part of me that craves order and gets excited about color-coding desperately wanted all matching hangers, and I found these plastic hangers in white from Walmart in a pack of 18 for under $2. I bought like 4-5 packs. (If you’re looking on Walmart’s app for them, they’re the store brand, Mainstays. They also make them in children’s clothing sizes.)

As I started this project, I decided I needed a few items to really make the most of my closet space. I went to Walmart and Dollar General to pick up some supplies that were budget-friendly. At Walmart, I purchased two Mainstays 6-shelf closet organizers that hang from the existing clothes-bar. I also bought a clear and white Sterilite 3-drawer cart, a Mainstays fabric and plastic shoe hanging organizer, and two small, round battery-operated touch lights. At Dollar General, I bought a 3-cube storage shelf and two canvas bins.

All in all, the purchases cost well under $100, and the work took just a handful of dedicated hours on a day when my son was with his father.

Here’s what I did: I took EVERYTHING out of my closet and got to work. I made a few different piles: one for tossing, one for donating, and one for keeping. That helped organize clothes and random items.

I also assembled the cube shelf, then laid it on its side against the back wall. I also set the Sterilite drawer cart beside the cube shelf. Instantly, that created additional storage and made use of my floor space. I put the shoe organizer on the side wall beside my drawer cart and put all of my flats, flip flops, and sandals in there. I put the hanging closet organizers above the drawer cart to fill with boots, sneakers, and heels. I put my jewelry box and small workout items in the cube shelf and put miscellaneous storage items in the canvas totes on top of the shelf.

I also put batteries into the touch lights and installed them, with command strips, to the wall beside either part of the doorway. The idea is that it’d shine a light onto my clothes or shoes for early mornings as I got ready – especially since there isn’t an existing place for a lightbulb or fixture in my closet. This is actually my favorite part of the makeover because it’s so dang useful – and really easy to replace the batteries.

The last part was actually putting my clothes in, taking the donations off, and taking the trash out.

All in all, I think it turned out pretty decently. It definitely calmed my anxiety and lets me leave my closet open from time to time, instead of closing away the madness that is my wardrobe.

What do y’all think of my end result?

5 Things to Do at Home with Your Toddler

With COVID-19, I know a lot of you are at home – whether you’re temporarily without income or working remotely, either way, you are likely getting a lot more facetime with your little ones. If you’re a stay-at-home mom regularly, your facetime has shifted to less out-of-home adventures, which probably feels a little limiting. Personally, for right now, I’m still in the office from 8:00 AM to 4:30 PM, but I took an extended weekend with some personal time to stay homebound with my 22-month-old for a few days. I planned some fun activities for us to do together, so we weren’t just watching Elmo on repeat. I wanted to really make the most of our time together.

Since so many of you are in a similar boat, I wanted to share 5 different activities that my little one and I did together over our four-day weekend. This list isn’t meant to be exhaustive or really that inventive – just meant to be shared as a list for anyone who might find one or two items on here that they hadn’t thought of just yet.

Here are the 5 activities we did together.

#1: Blanket Forts

Who doesn’t love a good blanket fort? It was easy enough to make this little blanket nest for my little guy. I used his toddler-sized rocking chair, the coffee table, and my two square faux leather ottomans to create the framework.

We turned on a movie and he crawled into the fort in his pajamas (affectionately called “jim-jams” at our house) for cheerios, stuffed animal cuddles, a good board book, and some veg-time.

The good thing about blanket forts: they can be fun for a long time – as long as an entire movie or two – and they aren’t dependent upon any type of weather!

#2: PB&J Picnics

This is another classic option for a day at home!

PB&Js are a staple in my house for lunch anyway, and my son could eat peanut butter all day, every day, so I knew this was sure to be a win.

Our rental has a sweet concrete picnic table in the side yard, overlooking the cow pasture beside us and with a view of the road where lots of motorcycles and pickup trucks drive by on nice days. I made us some sandwiches and included my son’s other favorites – applesauce and whale crackers – and we marched out to the yard together.

Some of you already know this, but a picnic for a toddler is really just a chance to run and play and have mom toss a bite toward you every once and a while, but it was still a lot of fun. And we saw trucks, motorcycles, and a plane, so it was, in his mind, a very successful activity!

#3: Feed the Birds

My son has been excited to listen to and see the birds this spring. In the mornings, when he wakes up, he tells me over and over again, “birds! Tweet tweet!”

As an Avon representative and an online shopper, I have a ton of cardboard boxes at the ready, and with my son’s peanut butter obsession, I always have extra in the cupboard.

I cut into the flap of a cardboard box, cutting out three hearts (although you could do any shape you prefer). I poked one hole in each heart for later hanging purposes. I spread peanut butter on each, then let my little one use his hands to sprinkle (or, in many cases, plop) a handful of birdseed onto the cutout shapes. My son had a blast with this! It was the perfect sensory activity for him.

Once they are sufficiently covered (or over-covered and you have to shake the excess off), you can put a piece of thread or twine through the holes and tie a simple knot. This will give you the ability to hang up the bird feeder later.

I like to put mine in the freezer for a bit so the peanut butter hardens, really putting the birdseed into place. Then, after a few hours, you can hang it up where the birds will be attracted – so near existing feeders or houses, in trees, or near flowers or plants.

My son has been saying “bird feeder” now for the past few days – and he loves to go look at his handiwork and to see if any birds have enjoyed their “snack.”

#4: Share & Read a Book

One of my favorite books as a kid was There’s a Monster at the End of This Book. My favorite Sesame Street monster was Grover, and my parents did an excellent job of always reading with fun voices and lots of inflection.

I was so excited to find a copy of this favorite Golden Book at Old Time Pottery’s Knoxville location! I snatched it right up and we’ve been reading it together ever since.  I love how excited my little one gets when I read in an attempted enthusiastic Grover-esque voice – and how he answers every question and eagerly anticipates each page turn.

Do you have a favorite childhood book? You may not be able to go in-store for it, but I would highly recommend searching online – the memories it’ll bring back and the new memories it’ll make will be well worth it!

#5: Cook Together

When my dad was a kid, they made individual pizzas on English muffins. It’s something he brought into his own family; when my sister and I were growing up, he’d slice open an English muffin, pull out the tomato sauce, and let us “decorate” our own pizzas with cheese and toppings.

I introduced my son to this activity this weekend, and he had SO MUCH FUN. I had to take the cheese away, there was so much scattered at one point! It made a great sensory and coordination activity, and he felt like he was helping Mom-mom with the cooking, which was a big win.

I just cut English muffins in half, preheated the oven to about 325F, and then spread sauce on each open muffin. I let the little one have his hay-day with the cheese, and then we cooked them for about 8-10 minutes max.

* * *

I hope that this list gave you at least one new idea! If so, let me know in the comments which you decide to try out.

What activities are you doing at home with your kiddos to pass the time and make the most of quarantine?

One-Pan Chicken & Veggie Recipe

Growing up, my family almost always had dinner around the table. My mom would make dinner at least five times a week (if not more), and we would sit around her round wooden table and eat. More importantly, we would fellowship. We would catch up about each of our days, joke, and laugh.

Several months ago, my dad told me that his favorite thing in the world is to eat dinner with our family at the kitchen table and end up staying there long after our plates are empty, just talking and laughing.

My sister and I are both moved out now – she’s married and I’m a single mom, so we each have family units of our own and homes of our own – but returning to the kitchen table at our parents’ home is something happens fairly often for us. It’s a tradition that I think our whole family values and cherishes.

In my own home, I am very conscious about getting dinner set up each night that my son is home. He’s only 22 months old, but having him sit at the table with me, thank God for our food (and yes, he prays in his sweet little voice and it’s amazing), and talking to him while we eat together is so important to me. I’m grateful for all the people in my life – my parents, sister and brother-in-law, boyfriend, and close friends – who help me ensure that my son always gets to experience dinner in this fashion – with prayer and fellowship and good (and healthy) food.

But let’s be very real and transparent here: dinner is not always easy to get on the table when I’m alone with a less-than-two-year-old. He constantly wants to see what I’m doing on the stovetop, what spoon or spatula I’m using, or wants a snack minutes before dinner is going to be served. So I’ve had to come up with some easy-to-make dinners that allow me to be as mobile and versatile as a toddler-mom needs to be.

One of our favorite easy meals is the one-pan chicken and veggies dinner. Even better than being easy to make – it’s really inexpensive. I can usually make this meal for under $10!

At Walmart, I picked up Great Value frozen carrots and Great Value frozen broccoli for $0.78 each, a bag of frozen Tyson chicken breasts for $4.50 (on sale – regularly $5.84), and a loaf of Italian bread from the in-store bakery for $1.00. I typically have the seasonings needed in my cupboard and fridge already.

Here’s an easy ingredient list for reference:

  • 1 bag frozen broccoli
  • 1 bag frozen carrots
  • 2 chicken breasts (thawed)
  • Olive oil
  • Lemon juice
  • Salt
  • Pepper

Preheat your oven to 375F.

While your oven is heating, lightly spray a baking sheet. Then, cut up your raw chicken into cube-like, bite-size pieces. I use kitchen scissors (just be sure to use a LOT of germ-fighting soap to wash them afterwards!) to cut mine, and I usually cut them into nickel or quarter-sized pieces. Scatter them around the pan. Then, open up your frozen veggie bags and spread those out on the pan, too. I use the entire bag of each.

After your pan looks evenly dispersed (which is easy to tell with such vivid colors), lightly pour olive oil over it. It should be a slow, steady drizzle and you’ll want to move in a zig-zag pattern across the pan. Then, do similarly with your lemon juice – but use slightly less unless you just LOVE lemon flavoring – the lemon flavor will be stronger than the olive oil, so I use it a little more sparingly. Salt and pepper lightly across the entire pan.

Cook on 375F for 18-20 minutes.

Before you turn the oven off when your timer rings, cut into one of the larger pieces of chicken to confirm it’s done. It should be white throughout.

Once done, I usually cut up some of that Italian bread I mentioned and warm it in the oven for just a few moments while I’m plating the chicken and veggies.

Serve & enjoy!

This recipe usually feeds my son and I with leftovers for us each to eat for lunch, so we could probably feed three people for dinner with it. If you want to make it stretch further for a family of four, I’d suggest making rice or pasta as a base. We love just the veggies and chicken with warm bread, but an additional starch base would certainly help it be more filling and stretch the main course a little further.

I have also made it with a California-style vegetable mix (frozen bag of broccoli, carrots, and cauliflower) and that can work well if you like cauliflower. I discovered that my son is not the biggest fan, so more broccoli and carrots are better for our kitchen table!

For my low-carb friends, make this dish without any rice, pasta, or bread – the only carbs should be the natural sugars in the carrots. It’s not necessarily Keto because of that, but it’s definitely a great lower-carb option.

What easy, affordable dinner options do you love?

If you try this one-pan dinner, let me know how it goes in the comments! Happy cooking!

Spring Decor Tour

Spring has SPRUNG! At least, in my heart. Even if the weather is only acting like springtime every other day.

My rental home is decorated for the spring and for the coming Easter holiday! I wanted to do a quick show-you-around style blog post to celebrate the coming of a warmer, happier, lovelier season.

In the midst of this COVID-19 health scare, a lot of you are quarantined all day – or at least before/after work – at your homes. If you’re afraid you’ll be bored to death or climbing the walls, don’t panic. There’s lots of springtime cheer to be had in your own home or in your own backyard.  I’ll show you what I’ve done to make my home feel a little more joyful and seasonally spirited.

First and foremost, how cute is this country-spring-inspired centerpiece on my table? My tablescapes and centerpieces are so much fun for me to change up seasonally, and this spring’s décor is no exception! I purchased this brown-checked round tablecloth for $1.99 at the local AM VETS thrift store in Knoxville – thrift store steal of the season, right?! And I found this so-sweet rabbit egg, the wooden eggs in my cylinder vase, and the Rae Dunn watering can all at TJMAXX.com.  I paired these items with greenery I already had, and I placed them all on a jute Better Holmes and Gardens placemat from Walmart for under $3. Using a single placemat as a centerpiece base is a cost-saving trick I’ve been using for years – they’re less expensive, easy to change out seasonally, and small enough to store in a drawer or on a closet shelf.

I’ve also decorated my bookshelves with light touches of spring. These sweet bunnies were under $5 each at Old Time Pottery, and the birdhouse in the second picture was $7 at Big Lots. I already had the greenery and the other décor.

(Oh, and check out my Harry Potter collections. Didn’t mean to feature those, but I love them, and they stay up all year round!)

You can’t forget the outside of your home! If it’s nice enough out, I say GET OUTSIDE. It’s not worth being cooped up inside and contracting cabin fever. If you have a space for your little one(s) to play, let them – even just for an hour while the sun is shining.

And, while they’re outside, YOU can get some outside spring décor up to cheer up your space.

On my front porch, I added seasonal spring cushions to my bench ($5 each at Walmart) and repurposed a galvanized watering can into a planter (just $2.99 at a KARM thrift store). Pansies scream “spring” to me, so they seemed the perfect flower to plant here!

I also always decorate my door. The unique thing about my rental is that the house was built to take advantage of the view – which faces the opposite direction than the driveway or road. So, I use my front door as a back door, and my side door from my carport as a front door. That means my side door needs to be extra homey and welcoming.

Here’s what I’ve added. A sweet bunny statue from Lowes a few years back, a garden flag (bought off of Amazon for $6.99 from seller BLKWHT Home & Garden), some bulbs in a cute planter from Lowes this year, and a few planters from last season. The sweet wreath was a handmade gift from my sister when I moved in last August.

What are some of your spring décor faves for your home? If you haven’t had a chance to embrace the season yet, I hope you’ll find time as you stay home – all day or around your work schedule – to bring yourself and your home some joy this season!

Peanut Butter Chocolate Chip Cookies

When my mom and aunt were growing up, one of the things they did together was make peanut butter cookies. I remember hearing that my gram’s Betty Crocker cookbook would open automatically to the peanut butter cookie page – as if the smeared peanut butter fingerprints and cracked spine knew exactly where the girls wanted to go each time.

Naturally, in our house as my sister and I grew up, peanut butter cookies became a favorite, too. As I got older and Pinterest became the source of all baking answers (and honestly, answers of all sorts), I discovered – like many others – the magical powers of the 3-ingredient peanut butter cookie.

In my first apartment, I made a lot of batches of these simple cookies. I always felt that they were a little gritty, though, and were missing something.

Over the years, I’ve tried a lot of adaptations to the cookies, and I’ve finally found the secrets of success: a little less sugar and – everyone’s favorite ingredient – chocolate! I knew these were a winner when my mom – the original expert of peanut butter cookies – said they were delicious! I hope you’ll enjoy them just as much.

Here’s what you’ll need:

  • 1 cup of peanut butter (I prefer the natural peanut butter)
  • 3/4 cup of sugar
  • 1 large egg
  • Semi-sweet chocolate chips (approx 1/2 cup but totally up to your taste buds’ preference)
  • Sprinkle of flour

Preheat your oven to 350F.

In a medium-sized mixing bowl, add in your sugar, peanut butter, and egg. I don’t use a beater – there doesn’t seem to be enough moisture for that to be successful and it’s easier for me personally to control the texture with a fork. Once all of the ingredients are well-blended – so no clumps of sugar or areas of only peanut butter – you’ll get ready to add in your chocolate chips. But there’s a process for this that will help in this recipe or any recipe with added floating ingredients!

Grab a smaller bowl (I use miniamo melamine bowls from my sister – you can find a 4 set on Amazon for around $10, but any small bowl will work). Empty your chocolate chips into the bowl. Then, using a spoon, lightly sprinkle flour over the chocolate chips. I usually shake my bowl a little to make sure all of the chips have a light coating of flour. The flour coat helps any added item stay suspended in batter, rather than sinking to the bottom. This tip can be applied to other items, too – like walnuts in any batter, such as cake, brownie, or bread batters.

Now that your chocolate chips have a light dusting of flour over them, you can slowly add them into the cookie batter. Make sure you only add some at a time, then stir so your chips are somewhat evenly distributed throughout. I also always save a few chocolate chips for later – some for my kiddo’s snack-grabbing fingers – and some for any cookies that look like they’re lacking even distribution.

Stick your batter in the freezer for a little bit – 10-15 minutes or while your oven finishes preheating. This will help the batter firm up, which is ideal for the cookies to have the right texture.

After the batter is cold and thick, but not completely stiff, you’re ready to go! Bring it out and roll it into balls – they should be a little smaller than ping-pong ball size, and the batch should allow you to make about a dozen.

Spread them out on a sprayed baking sheet (I usually use two smaller sheet pans). Then smush them down using a fork in a cross-hatch pattern. If no chocolate chips are showing on the top of the cookie, I usually add 1-2 of my extra chips just for even distribution and presentation.

They should go in the oven for 8-12 minutes. In my oven, 10-11 minutes is usually the best time range, and then I let them cool on the pan for about 1-2 minutes. You want to make sure that the bottom of them is a golden-brown when you use a spatula to take them off of the pan.

If you’re sugar-free or on the Keto diet, you can substitute ingredients – sugar-free peanut butter, Stevia or other sugar substitute (but be sure to use their recommended equivalency chart, since 3/4 cup of sugar is different than 3/4 cup of sugar substitute), and sugar-free chocolate chips.

Enjoy, y’all!

Hi, there, y’all. I’m Kate.

Welcome to my blog!

If you’re wondering what you’ve stumbled across, I want to take a moment to introduce myself. Here’s the reader’s digest version.

I’m a divorced, now-remarried (as of 12.4.21!) momma who lives in a small town not far outside of Knoxville, Tennessee. I’m a lover of the kitchen, of good books & poetry, of hot tea in cute mugs, of ice cream, of Sunday morning pews, of bracelets & bangles, of candles, of color-coding, and of homemade cookies & chocolate with toffee.

I’m excited to share bits of my life with you – from momma hen hacks to easy-to-follow recipes to home décor – and, of course, it’ll all come smothered in my sassy-but-sweet Tennessee twang!

Follow this blog & find me on social media to get to know me better!

I’d love to hear from you – so feel free to introduce yourself in the comments section here on my website, on Facebook posts, or on Instagram posts. I’m excited to welcome you to my community!